|
My notes are below but a self-published book, The Making of Sulphides by Ray
Laubs, is available for $24.99
for the book or $15 as a download. The author is also selling on eBay, one
copy at a time. 2008-09-21
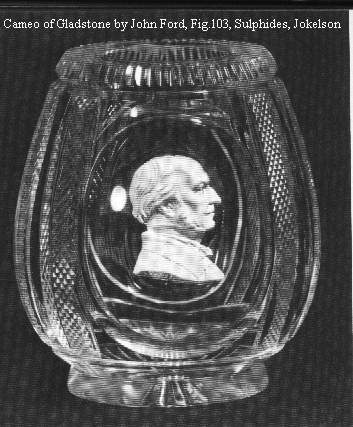 Sulphides
are a silvery white opaque inclusion usually molded into a face
or bust and placed in glass, either solid or as a surface detail,
often in a ornate cut glass plate, pitcher or vase. (Examples and
books below) According to one version, it was a cheaper version of silver
in glass, but I have seen little silver in glass. Sulphides
are a silvery white opaque inclusion usually molded into a face
or bust and placed in glass, either solid or as a surface detail,
often in a ornate cut glass plate, pitcher or vase. (Examples and
books below) According to one version, it was a cheaper version of silver
in glass, but I have seen little silver in glass.
9/21/99 Several months ago Henry Havens posted a note (see below) about sulphides, referring to work
from Paul Stankard, which Henry had not tested. I decided to take
some stuff along on my trip to Corning and try it out. I did
three test pieces.
The basic suggestion offered was to grind the crystal used as
encasement into a 100-200 mesh flour and then mix 20% of this
with 80% 200 mesh silica flour and make the sulphide tablet by
mixing in gum arabic. The resulting tablet is to be heated to red
hot, cooled, cleaned up, heated again to red hot and picked up.
 I began by pounding away at some broken pieces of crystal and
using the finest strainer available to separate out the finer
bits. As I joked, “exactly 96 1/2 mesh” but probably
coarser than that. Having collected a half a paper cup of grit, I
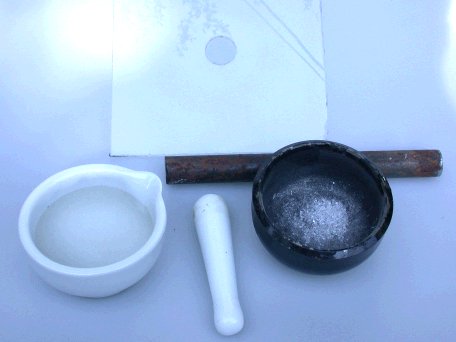
used a piece of sheet glass as a mixing surface. [2004-08-05 Having done a
couple, I am now using a heavy steel pipe end as a bowl with a 1" solid steel
rod as a pounder/punch using a piece of Plexiglas with a hole in the center as a
moveable cap to keep chips in place. The pounded glass must be washed to
remove dirt and swept with a magnet to pick up iron then screened. I am
using a porcelain mortar and pestle to grind the glass and am following that up
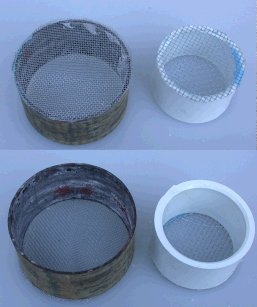
using it to grind and mix the silica flour (below) and the glass.] [While
kitchen strainers seem a reasonable choice for this project, I have made several
strainers with various mesh sizes. The early ones used measured mesh brass
screen available at ceramic supply and some hardware stores and I soldered the
mesh to the rim of a tin can with both ends cut out. Now I think that PVC
pipe or pipe couplings with the screen glued with E-6000 or Goop Marine is
working well. I lay a sheet of plastic film on a flat surface, lay a
square of screen down, ring the PVC rim with the glue, place it on the
screen and add a weight. After the glue has set, I peel off the plastic
and trim the screen to size. 2004-08-29 I began by pounding away at some broken pieces of crystal and
using the finest strainer available to separate out the finer
bits. As I joked, “exactly 96 1/2 mesh” but probably
coarser than that. Having collected a half a paper cup of grit, I
used a piece of sheet glass as a mixing surface. [2004-08-05 Having done a
couple, I am now using a heavy steel pipe end as a bowl with a 1" solid steel
rod as a pounder/punch using a piece of Plexiglas with a hole in the center as a
moveable cap to keep chips in place. The pounded glass must be washed to
remove dirt and swept with a magnet to pick up iron then screened. I am
using a porcelain mortar and pestle to grind the glass and am following that up
using it to grind and mix the silica flour (below) and the glass.] [While
kitchen strainers seem a reasonable choice for this project, I have made several
strainers with various mesh sizes. The early ones used measured mesh brass
screen available at ceramic supply and some hardware stores and I soldered the
mesh to the rim of a tin can with both ends cut out. Now I think that PVC
pipe or pipe couplings with the screen glued with E-6000 or Goop Marine is
working well. I lay a sheet of plastic film on a flat surface, lay a
square of screen down, ring the PVC rim with the glue, place it on the
screen and add a weight. After the glue has set, I peel off the plastic
and trim the screen to size. 2004-08-29
 My method of mixing was drawn from movie/video shots of heroin/cocaine
lines: I put down one line of pulverized glass and four lines of
silica flour the same size and then used a knife blade to lift,
shift and mix the lines into some more combined arrangement. I
then added a few drops of Gum Arabic. (Note: Gum Arabic is
available as a powder, at ceramic supply places apparently, where
it should be mixed to a slight tackiness when finger tips are
touched together. I bought a bottle sold for use as medium at an
art store and paid about $8 for 75 ml (2.5 fl.oz.). Not being
sure if it was ready to use, I tried a bit of dilution, which
caused problems, so it is ready to use. Based on my tests, my
small bottle should last a very long time.) I have now [2004-08-29]
purchased a couple of pounds of dry gum arabic from a ceramic supply for much
less and suspect it will last me forever as a few table spoons make a pint.
It is much darker amber than the clear looking artists supply. My method of mixing was drawn from movie/video shots of heroin/cocaine
lines: I put down one line of pulverized glass and four lines of
silica flour the same size and then used a knife blade to lift,
shift and mix the lines into some more combined arrangement. I
then added a few drops of Gum Arabic. (Note: Gum Arabic is
available as a powder, at ceramic supply places apparently, where
it should be mixed to a slight tackiness when finger tips are
touched together. I bought a bottle sold for use as medium at an
art store and paid about $8 for 75 ml (2.5 fl.oz.). Not being
sure if it was ready to use, I tried a bit of dilution, which
caused problems, so it is ready to use. Based on my tests, my
small bottle should last a very long time.) I have now [2004-08-29]
purchased a couple of pounds of dry gum arabic from a ceramic supply for much
less and suspect it will last me forever as a few table spoons make a pint.
It is much darker amber than the clear looking artists supply.
Using the knife blade, I folded the mass repeatedly to make a
paste. Approximate proportions might be 2 tablespoons of glass/flour
mix and 1/4 teaspoon of gum (24:1). It was very easy to add too
much gum, so I ended up with a sloppy mix. In one case I added a
bit more flour and in another I let it dry for a while before
continuing. I was working on a flat surface, shaping the blob as
I would pottery clay. As far as I can tell, the mixture has
virtually no shear strength - if it workable, it slumps. To me
this means that the proper method of using it is to cast it in a
mold. When I dried the material enough to make it workable, it
was easy to break it apart, like a sand/clay mix with too much
sand. [I am now mixing and continuing grinding in a mortar and pestle.]
Having created some shapes of low artistic quality, I carried
out some tests, talking with Matt Labarbera and Bill Gudenrath
for suggestions. The first tablet/plaque I made was dry to handle
when we attempted to warm and then heat in the gloryhole but it
exploded into powder while maneuvering it. This was also the one
with some water added to the gum. All further tablets were dried
thoroughly on the bricks at the back of the furnace. I was
surprised at how tough the dried tablets were. I used a nickel on
one piece in an attempt at molding and to get some sharp
definition. The coin settled into the mix and when it hardened (along
with the adhesive effects of the gum), I learned exactly how hard
the stuff was to work as I pried it into two pieces and chipped
at the edges to release the coin.
 In my first
test, since I didn’t need to clean the tablets, I tried
heating once (on a steel plate in the gloryhole) and picking up.
I was picking up the “back”, then dropping a gather of
glass over the “face” and further gathering over that.
The test piece formed a bubble behind the piece that lifted it
off the pickup and stayed in place as the piece was worked and
cooled. In my first
test, since I didn’t need to clean the tablets, I tried
heating once (on a steel plate in the gloryhole) and picking up.
I was picking up the “back”, then dropping a gather of
glass over the “face” and further gathering over that.
The test piece formed a bubble behind the piece that lifted it
off the pickup and stayed in place as the piece was worked and
cooled.
Considering that a failure, the next tablet was then heated to
red and the plate rested for a while. The tablet was then
reheated to red and successfully picked up and worked into a
small paperweight which shows no signs of incompatibility or
gassing.
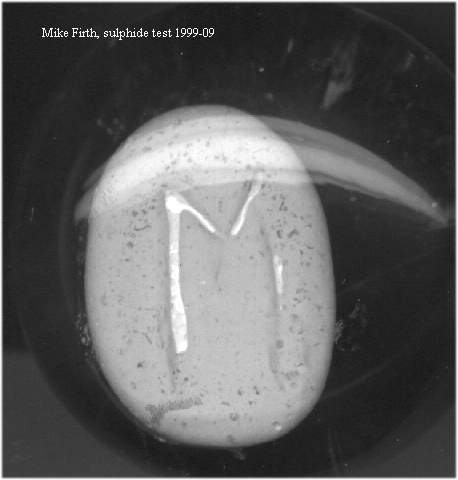
 The last test was a crude
sculpture of a face that had to be reworked several times as it
dried, resulting in thin weak material at the eyes and mouth. The
piece was successfully dried and heated, reheated and picked up.
While working into the weight, the pieces separated slightly,
creating a piece that looks a bit like an Easter Island statue.
My next step will be to create some small plaster molds with
proper release to make the tablets. 9/21/99 The last test was a crude
sculpture of a face that had to be reworked several times as it
dried, resulting in thin weak material at the eyes and mouth. The
piece was successfully dried and heated, reheated and picked up.
While working into the weight, the pieces separated slightly,
creating a piece that looks a bit like an Easter Island statue.
My next step will be to create some small plaster molds with
proper release to make the tablets. 9/21/99
Image (right) from laying on scanner.
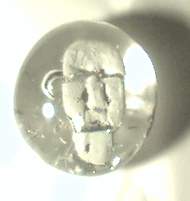 Image (left)
low res USB camera. Image (left)
low res USB camera.
6/11/2000 Part of my problem in playing around with the
sulphides is my lack of interest (and skill) in small scale work,
including carving, which is part of why I do furnace work rather
than torch work. So I have been looking for sources of small
objects that might be suitable in paperweights. One item I found
was a curved face drawer pull with an Indian profile like the
nickel on it. I worked this image, chipping away at a plaster
copy to make a profile outline and then molded that. I have also
looked at ceramic molds, but if it is small enough, it is in a
multi-mold that costs a bunch.
But, as I keep looking, I was surprised to discover at Hobby
Lobby what is offered in the way of resin molded buttons,
including little tools, baseball gloves with a ball, hand shapes,
etc. I bought several assortments for a dollar or two each and am
making latex rubber molds to cast sulphide mix in. 6/11/2000 [Later I found
painted glue on shapes, like butterflies, that gave more choices. 2002-01-23]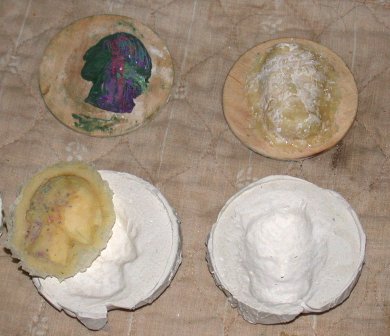
At right are work with clay originals, a Washington profile and Lincoln head,
built up on thin wooden disks then covered with many thin layers of latex.
An added aluminum foil surround holds a plaster of Paris support so the latex
stays level and does not distort when wax, investment or sulphide mix is added.
2004-08-05
7/18/2000 Posted by adsrht on July 15, 19100 at 18:59:50:
In Reply to: Sulphide. posted by Tommy on July 15, 19100 at 16:44:08:
: Is it possible to add colours to a sulphide cameo? Then encase
it in a paperweight?
: Thanks
: Tommy.
Yes. Use ceramic glaze stains. Places like Laguna or Mason color
have them.
Recipes and Notes from others
Hi Eric,
This recipe comes to me from Roland Butler in issue #5 of
Independent Glassblower.
Potash Feldspar 17.6oz
Edgers plastic kaolin 34.8oz
Potters flint 8.0oz
Colemanite 5.2oz
Whiting 4.0oz
Bentonite 2.4oz
Ball clay 2.6oz
Mix dry and then add enough water to make a plastic putty. Air
dry and then fire to cone 5 (2200F)
I haven't tried the recipe so I don't know how it works. It's
supposed to have an LEC of 95. When you do try it,
will you write me and let me know how it works? thanks---Tom
Posted by Henry Halem on June 01, 1999 at
13:43:33:
I was recently asked to research how paper weight sulphides were
made and although paper weights are not my
area of expertise I remembered my friend Paul Stankard had done
some research in the area when we were at
Pilchuck some years ago. Paul was very happy to share his
findings. I thought posting it on this site would be a
good place for sharing those findings. I'll also post it on my
web site.
Henry
White Sulphide Inclusion for paper weights
80 % SiO2 200 mesh
20 % crystal fine powder, same glass as being used. 100 to 200
mesh preferable. Grind in a mortar and pestle
and mix thoroughly with the silica.
Gum Arabic
For color add Paradise Paints or Kugler color.
Procedure for preparation: Add enough Gum Arabic solution to make
a moldable paste. Press paste into mold
and allow to almost dry. While still a bit moist but easily
handled remove from mold and put in kiln. Fire to
cherry red and cool. When cool remove from kiln and clean any
areas that need enhancing. The "sulphide" will
not be brittle as the glass will have fused the piece together.
After cleaning put into pick-up oven and reheat to
cherry red once again. It is now ready to be encapsulated in
weight.
The directions for making the "sulphide" was told to me
by Paul Stankard. He along with Dwight Lanman did the
experiments at Pilchuck some years ago.
History and Bibliography
PAPERWEIGHT ITEMS - Sulphides & Cameos
"It has been said that the original idea for the sulphides
resulted from the silvery appearance of drops of dew on
flowers. Experimenters found this beautiful silvery effect could
be secured through combining the fine china
clay with crystal. The silvery effect which resulted from this
combination led to the name "sulphides" (of
silver) or "nitrates" (of silver) [only from
appearance? MF]
In making cameos, a wooden mold was first carved and then cast in
iron. A ceramic composition was poured
into the sliding iron mold, slightly baked and gradually cooled.
For use, the clay is heated red hot.
Pellat patented using fine china clay and super silicate of
potash molded at higher temperature than needed for
working the glass." This supposedly reduced the cost. Forms
"may be painted with metallic colors." Things
may be enameled, patterns are lined at the back with gold.
Old Glass Paperweights, Bergstrom p.59
Title: Sulphides; the art of cameo
incrustation.
Author: Jokelson, Paul, 1905-
Published: [New York] Nelson [1968]
Subject: Sulphides (Art)
Material: 159 p. illus. 26 cm.
Note: Bibliography: p. 147.
ISBN: $15.00
-----------------------------------
|