CLAY & CLAYS
Clay these days refers to any material that can be molded into shape and stay
there. The material can be paper, earth, plastic, or dough. Although sand,
plaster and cement/mortar mix can be made stiff enough to mold, they are
normally not used this way and are not called clay. In the past, the word
clay by itself always referred to a material from the ground created by natural
weathering of certain minerals. This clay consists of flat platelets that when
wetted down will slide past each other but still adhere and hold the new
position. Usually the clay must be fired in a kiln at high temperature (1800F or
more) to convert part of it to a glassy substance (vitrify it) for it to have
permanent strength. Just drying it will produce a weak object that will soften
if it gets wet. 2012-10-12
Modeling clay thus referred to earth clay moistened
with oil and wax rather than water. Long used in gray, white or dark green in
large quantities for the original of bronze and other sculptures as well as full
sized car concepts, it is now available in many colors as it is used for
claymation - the animation of figures in 3D for photography where the position
can be modified for each frame - Gumby, etc.
Air dry clay usually refers to earth clay with added binders added to give it
strength and avoid dusty surfaces when dried. Normally, air dry clay will soften
if gotten wet. Some air dry clays can be fired at low kiln temperatures (04)
making them more permanent.
Paper clay is one of two materials. The more obvious one is finely ground paper
that forms an air dry clay of very smooth consistency that can be carved like
wood and is popular for models of dolls. The other one is an earth
clay/paper mix that is easy to work and results in a lighter clay object. The
paper burns out on firing.
Polymer clay is finely ground plastic in a solvent
binder that is baked at about 275F to form hard PVC plastic objects. It works
easily and is brightly colored and is very popular for small projects like
charms, in part because it is fairly expensive. Polymer clay is very sensitive
to overheating and will give off noxious fumes, including chlorine, as well as
darkening.
Recently, companies apparently can't define their product as clay without
calling it modeling clay even though it also has another good adjective -
so we see paper modeling clay, air-dry modeling clay, polymer modeling clay.
|
|
 Modeling
clay is generally soft enough to work with any handy tool, including
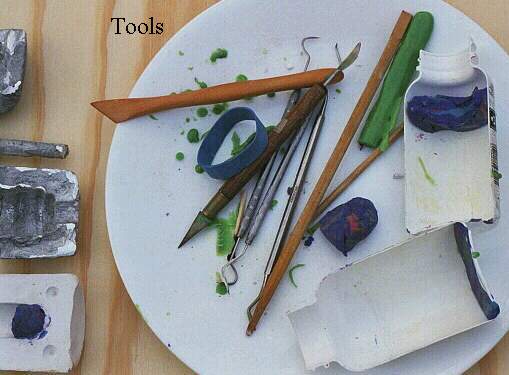
fingernails. On the plate are legitimate wood and metal tipped clay tools
sold for pottery clay, a chop stick, and dental picks sold in hardware stores.
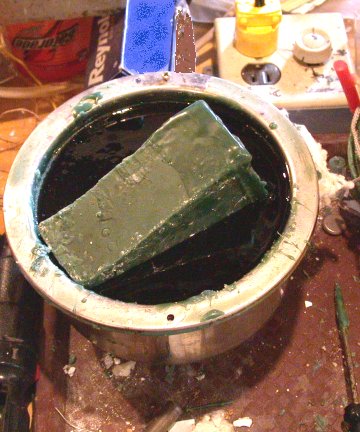
Shown on the oval container and in the large image is of a 2" square of 1/32"
brass cut to various angles - all the edges rounded. It was partly made to go on
a plane before requirements got so stiff but also to fit conveniently in the
plastic container with some clay and mounting disks for small work as
shown
below. 2010-01-17 Modeling
clay is generally soft enough to work with any handy tool, including
fingernails. On the plate are legitimate wood and metal tipped clay tools
sold for pottery clay, a chop stick, and dental picks sold in hardware stores.
Shown on the oval container and in the large image is of a 2" square of 1/32"
brass cut to various angles - all the edges rounded. It was partly made to go on
a plane before requirements got so stiff but also to fit conveniently in the
plastic container with some clay and mounting disks for small work as
shown
below. 2010-01-17
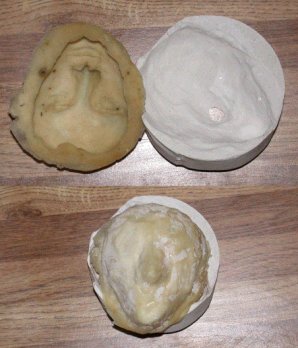
This soft clay model was then used to make a plaster mold in the halves of a
small plastic bottle using standard clay mold techniques. (i.e. support the
model so the plaster will come to the centerline of the model, pour plaster and
set; treat the surface with English soap as a release, add the other half mold,
cover the rest of the model, set and unmold.)
Top |
|
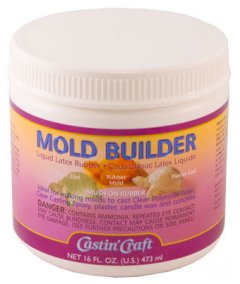 Latex
mold building compound as used below and
here is most commonly available at
craft and hardware stores in a plastic 16 ounce package like that shown.
Other sizes up to a gallon in this brand and in other brands up to five
gallons are available. Inside is a thick white cream that is natural
latex (originally tree sap from rubber trees) preserved with ammonia.
When the ammonia evaporates the compound turns amber as shown below. Latex
mold building compound as used below and
here is most commonly available at
craft and hardware stores in a plastic 16 ounce package like that shown.
Other sizes up to a gallon in this brand and in other brands up to five
gallons are available. Inside is a thick white cream that is natural
latex (originally tree sap from rubber trees) preserved with ammonia.
When the ammonia evaporates the compound turns amber as shown below.
A factor in using it is that it can not be applied too thick because the
surface sets and prevents the mass below from setting. Air flow and
especially warm air flow speeds drying, so a layout works well with a
small fan blowing on the project with a return every 15 minutes or so to
paint another layer. Brushes must be cleaned with soap and water
before the rubber sets in them.
An alternative, which is used when making masks, it to have a plaster mold
or model. As with clay, the dry plaster pulls water out of the latex
and allows it to cure. This
PDF document from
a latex vendor gives good instructions for working this way.
2012-09-19 |
Latex rubber is moderately strong in terms of peeling it off the model,
but is structurally weak. The company
shows making molds of upright objects by flaring the base and then
casting by supporting the mold by the flange upside down in a hole in a
cardboard box. For the kinds of molding I do, it is much faster and
accurate to apply a plaster shell to the back of the latex mold while
still on the model. In cases where there is a core or mount for the
model, as just below, fitting the shell to the mount permits pouring wax
between two which would be much more of a problem with a full surround
mold or and open mold where the result would have to be heavily trimmed.
When latex is covered with plaster or used to mold plaster, the water in
the plaster makes the amber mold turn a foggy white and it is somewhat
weaker. The water evaporates and the amber color return. 2009-08-02
The entire process is also shown on
car-body-mold.htm with the lighter color damp latex; the object there
being to make a mold for pressing polymer clay to make a plastic model.
2012-08-17 |
|
The book The Prop Builder's Molding & Casting Handbook by Thurston James [almost all of which can be read at this
link] says that latex can be preserved from aging by chemicals in the
atmosphere by using Armorall, sold for tires and dashboards, etc.
2009-12-18 |
|
Knowledgeable people will notice that I don't mention silicone
molding materials. That is because I have not used them and they are
fairly expensive. As normally used they are more self supporting and are more durable than latex molds but are sensitive to sulfur in
materials which prevents setting.
Places discussing it suggest using slow drying water based clay or (link)
carefully testing the oil based clay or using a specific brand of silicone
compound. 2009-12-18
Top |
 This sequence shows the steps in building a mold on a
model. In this case to cast
investment on which wax will be built to make either a goblet or sculpture with
glass blown inside an outline structure. My thoughts on the structure have
been in two directions: a medieval knight type helmet or a brass structure like
the highlights on the face with glass becoming the skin and recesses in between.
This sequence shows the steps in building a mold on a
model. In this case to cast
investment on which wax will be built to make either a goblet or sculpture with
glass blown inside an outline structure. My thoughts on the structure have
been in two directions: a medieval knight type helmet or a brass structure like
the highlights on the face with glass becoming the skin and recesses in between.
Since this was not to be a realistic representation of a particular
person, I chose to be very bold. The core is a wooden egg with features
built with white Sculpy. As is usual, pieces of tag board are inserted on
the midline of the halves of the mold. Latex rubber is applied, forming a
good flange. If the rubber is applied in thin layers and air flow is
provided, it dries fairly quickly. The mold material packaging calls for 10-20
layers. This works if you have a lot of time to brush on the layers and
clean the brushes. [Other materials that cost more, like silicone rubber, mix up
and set chemically so one thick application may be possible.]
Brushing thin layers is important at the beginning no matter
what if there is small detail to avoid bubbles. If the mold material is
swabbed on thick, it is vital to let it dry until all the original white color
has changed to amber. In thick areas like the ear or eye socket on this
model, it may take a day, even with air flow, to set all the rubber. But
if it is convenient to pay attention once or twice a day - like on the dining
room table at breakfast and dinner. What I do is apply it further to the
thin areas, whiter in this case, so the mold is stronger and will not tear.
The
right picture in the center row shows selective application. Experience
guides how thick to make the rubber. Usually if it is off white in the
thinnest it is probably strong enough. The lowest row shows the second
side being prepared for pouring plaster, the first side having been done.
The purpose of the plaster is to support the flexible rubber to prevent
distortion. With a smaller mold, it can be supported at the flange.
I make the plaster fairly thick, which has to be poured fairly quickly.
2005-04-18 |
|
|
|
 The
picture to right shows the steps I use in making flat molds for sulphides and
glass while showing the general process. More images of variations are
shown here. I bought the wooden disks at Hobby Lobby or Michaels. Using
either plastic clay or Sculpey, I build up the image, like the profile of
Washington taken from the coin, often while riding or waiting for the bus, with
the detail work being done at a table. See sample tools above. Then thin layers of molding latex
are painted on, also making a flange onto the wood surface. Avoid the temptation to
put on a thick layer, which takes much, much longer to set than many thin
layers, even if cleaning the brush is a nuisance. The
picture to right shows the steps I use in making flat molds for sulphides and
glass while showing the general process. More images of variations are
shown here. I bought the wooden disks at Hobby Lobby or Michaels. Using
either plastic clay or Sculpey, I build up the image, like the profile of
Washington taken from the coin, often while riding or waiting for the bus, with
the detail work being done at a table. See sample tools above. Then thin layers of molding latex
are painted on, also making a flange onto the wood surface. Avoid the temptation to
put on a thick layer, which takes much, much longer to set than many thin
layers, even if cleaning the brush is a nuisance.
Before the clay model is removed, I make an aluminum foil cup around the
bottom of a glass and set the disk in it so that I can put plaster of Paris
neatly over the disk. [Mixing Plaster] The purpose of the plaster is to support the latex
mold when wax or investment is poured in. The shell mold looks like the
lower left on top of its support. To the lower right is the support for
the head (Lincoln) above it.
The mold can the used with casting wax or investment. If the wax is
used, the result is covered with investment, the wax melted and burned out, and
the hole filled with glass or metal, as making the dog and cat heads
here.
If investment is used, then it is encased in wax in shape of metal, which is
then further invested to allow casting a mold like those shown above. 2004-07-05
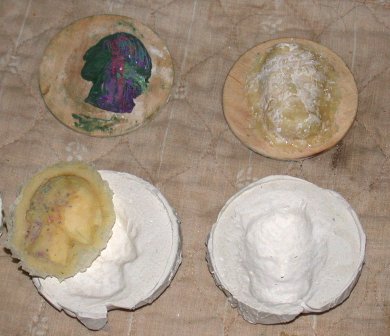
Storage Note
 Having
worked on the clay face for the bottle mold
this montage illustrates the pieces and two sides of the latex mold - interior
above, exterior below.
Through a curious optical illusion, the interior mold seems to bulge out at us.
The plaster keeps the latex from distorting under the weight of investment and
heat of melted wax. The lower image shows how the
latex turns white when kept moist - in this case from the plaster backing.
It is weaker in this condition, but dries out and strengthens again, turning a
uniform amber. Notice that not enough plaster was piled on, so there is a
hole where it was thin over the nose. 2005-05-01. Having
worked on the clay face for the bottle mold
this montage illustrates the pieces and two sides of the latex mold - interior
above, exterior below.
Through a curious optical illusion, the interior mold seems to bulge out at us.
The plaster keeps the latex from distorting under the weight of investment and
heat of melted wax. The lower image shows how the
latex turns white when kept moist - in this case from the plaster backing.
It is weaker in this condition, but dries out and strengthens again, turning a
uniform amber. Notice that not enough plaster was piled on, so there is a
hole where it was thin over the nose. 2005-05-01.
Storage Note: I now strongly recommend that if a
latex mold is to be kept, a plaster copy be made in it and dried and then
returned to the mold to preserve the inner shape. Also, as you might
expect, the mold will survive longer at cool dry room temperatures than at hot
or moist conditions. 2010-10-24
|
|
|
Casting wax is amazing. It is unlike
any candle or paraffin wax I had handled previously. First it is
very tough and flexible, so once built, a mold will take
considerable handling. Ironically, it is not very waxy - not
slippery or hard to hold. It can be poured to make sheets, cast
in plaster slots to make rods or flats, cast in plaster or rubber
molds to make components and, perhaps most importantly, welded
with a heated blade to assemble pieces and
carve or repair shapes. 2001-10-09
A wax model can be built up by making separate pieces, including by casting,
and applying to a base unit and by using various rod and flat sheet shapes to
provide pattern and structure. Jewelry supply places, such as
Roseco, offer a huge number of basic
ring shapes, tubes with ring profiles to slice off, broach/badge/buckle designs,
and molded add-on decorations as well as thin and thick rods, sheets and tubes
in various hardnesses. Operating cheaply, I buy bulk wax that comes in
small pellets and mold my own.
I have made plaster flats with grooves
from clay rolls in them and cans with tubes through them to make round wax
sprues. Melting wax over water in a bread pan and letting it cool produces
a very nice flat slab for cutting. Pouring wax onto water does not work well.
Microcrystalline wax is called that because it has finer crystals/flakes
than paraffin waxes: http://en.wikipedia.org/wiki/Microcrystalline_wax
2010-03-22
Make a pattern of the piece in wax, pour investment around it,
and go (well almost, see here.)
|
 WAX TOOLS - Certain hard
waxes can be carved with hand rasps and rotary tools, but the medium wax I
had purchased flexed some and resisted easy cutting - heated tools were
called for. Commercial heated loop and flat tools are available but
I started by using a thin flexible spatula sold for spreading frosting on
cakes to cut into and melt away parts of the wax. Bits of wax can be
melted on the surface for adding wax to a surface or filling cracks.
WAX TOOLS - Certain hard
waxes can be carved with hand rasps and rotary tools, but the medium wax I
had purchased flexed some and resisted easy cutting - heated tools were
called for. Commercial heated loop and flat tools are available but
I started by using a thin flexible spatula sold for spreading frosting on
cakes to cut into and melt away parts of the wax. Bits of wax can be
melted on the surface for adding wax to a surface or filling cracks.
For a while I did my wax working using an alcohol
lamp for heating metal blades and spatulas. This is nice because it gives
a flame that is wide and does not easily heat the blades to the point of
damage while giving a
variable control of temp and thus melting on the tool. The lamp shown
has a thick wick and a faceted base so it will sit upright or tilt as
shown. Despite the cap, alcohol can not be stored in it between
uses - it leaks or evaporates. The soft flame is very nice for controlled heating. It is less
nice because it cools quickly when used to melt into a wax casting. |
 So I rigged a
dimmer to plug in a soldering
iron, turning it up or down as needed. Full temp smokes and melts the wax
too fast. This is nice for constant controlled heat but doesn't allow
"feathering" - melting some wax and then pulling and chilling it in
place like with the alcohol flame heating. I am going to/did make a metal blade to replace a tip on the soldering
iron and see if it gives more variability. Little soldering irons with
fine tips are sold for sculpting the wax, for way too much money.
Roseco
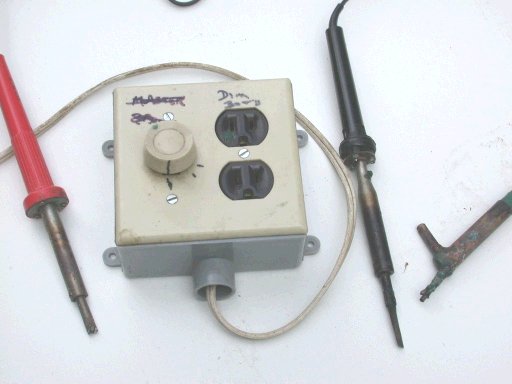
2005-05-23 The box shown is made of pieces available at hardware
store electrical departments, but actually came from my miscellaneous junk drawer,
and
includes a plastic outdoor surface mount 4x4" box, a switch/outlet cover
plate, a brown outlet, a cheap dimmer, and a short cord. The dimmer
can handle to 600 watts, but the soldering irons are 30-60 watts. The dimmer
knob is marked to permit resetting to good points found by trial and
error. [Wiring is simple - one cord wire to silver screw on outlet, other
to either dimmer wire/screw then connect other dimmer wire/screw to gold
outlet screw. 2011-11-12] So I rigged a
dimmer to plug in a soldering
iron, turning it up or down as needed. Full temp smokes and melts the wax
too fast. This is nice for constant controlled heat but doesn't allow
"feathering" - melting some wax and then pulling and chilling it in
place like with the alcohol flame heating. I am going to/did make a metal blade to replace a tip on the soldering
iron and see if it gives more variability. Little soldering irons with
fine tips are sold for sculpting the wax, for way too much money.
Roseco
2005-05-23 The box shown is made of pieces available at hardware
store electrical departments, but actually came from my miscellaneous junk drawer,
and
includes a plastic outdoor surface mount 4x4" box, a switch/outlet cover
plate, a brown outlet, a cheap dimmer, and a short cord. The dimmer
can handle to 600 watts, but the soldering irons are 30-60 watts. The dimmer
knob is marked to permit resetting to good points found by trial and
error. [Wiring is simple - one cord wire to silver screw on outlet, other
to either dimmer wire/screw then connect other dimmer wire/screw to gold
outlet screw. 2011-11-12]
Some small soldering irons mount their tips by having a
thread on the end and an inside threaded cup on each tip, but both of
the soldering irons shown use a set screw to hold the tip, which is
basically a 1/4" rod, which allows much easier/cheaper making of new
tips. The one on the right has a home-made tip of
rod with a slot cut across it with a narrow sheet of brass silver soldered
into it to make a heated spatula. The device
to the right is a first experiment at a heated tube for extruding slender
wax rods. The rod that fits in the soldering iron projects up and left,
the extrusion tube down and left and the feed tube with a wood pusher up
and right. 2007-06-04
I needed to cut holes in the wax shell,
so cross drilled a 1/2" thin brass tube for 1/4" thick wall brass and
soldered them together by installing in the iron and running it on high.
Not only cuts holes with end, but scoops excess inside wax. 2007-09-07 |
 Wax welding is done by heating both surfaces, over
the flame and/or with a flat heated tool and then pushing the two
together. The flat tool can then be used to further melt selectively
by sliding it into open places or by melting small bits of wax on the tool
and tilting it to deliver wax locally. The join can be smoothed with
the same tool. Wax welding is done by heating both surfaces, over
the flame and/or with a flat heated tool and then pushing the two
together. The flat tool can then be used to further melt selectively
by sliding it into open places or by melting small bits of wax on the tool
and tilting it to deliver wax locally. The join can be smoothed with
the same tool.
One of my techniques is to make a third of the final design in modeling
clay in a V-trough, make a mold of that, make 3 copies of the section in
wax and weld them together, as in this
wax model also shown in selected image at right.
|
 In
a more prosaic use of wax casting and welding, I
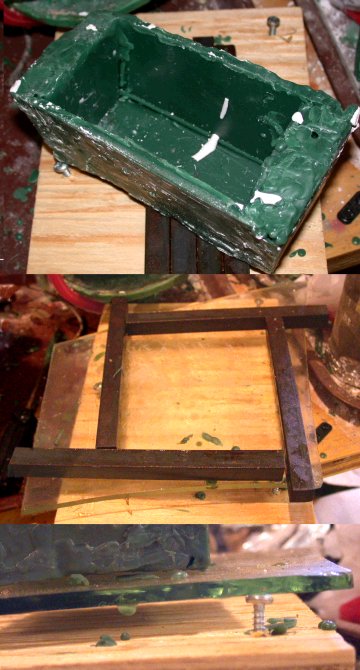
wanted to make both flat and tapered wax slabs for assembly of items like
the box form shown at right. In
a more prosaic use of wax casting and welding, I
wanted to make both flat and tapered wax slabs for assembly of items like
the box form shown at right.
One way to make thin or thick flat slabs is to melt wax on water and let
it cool there - which I do in my annealer/kiln, most commonly using an old
bread pan. Pouring melted wax on water does not work well - the
bottom is all pebbled. A slight problem is cutting the slab out of
the pan - it tends to fasten to the walls.
I wanted to make this shape to make some plaster holes. I considered the
problems of cutting the side slabs to exactly the same end angle and
decided I would rather assemble tapering wax to square end side pieces.
So I conceived the idea of pouring wax onto an oiled glass surface that
was tilted. Partly this came from having casually made thin puddle
slabs, dots, and strings by dribbling wax onto wet plastic or glass for
use in building models. For no good reason, I had on hand a 1/2"
square steel bar which I cut into four equal pieces and an odd piece of
1/4" plate glass - which I made safer by hitting the edges with a
sharpening stone. I set the glass plate on the heads of three sheet metal
screws put in a plywood plate, which allowed me to level or tilt the glass
as desired. The four steel bars can frame a rectangle up to their
length, as shown. Flat slabs can be made much more quickly than with
the water method because there is much less time for heating and cooling.
I melt wax in a pot taken from a popcorn popping cart put out for junk,
but I had planned on using a Fry Daddy pot. The same dimmer unit used with
soldering irons is used to control the pot temperature. 2010-03-23
 |
|
|
|

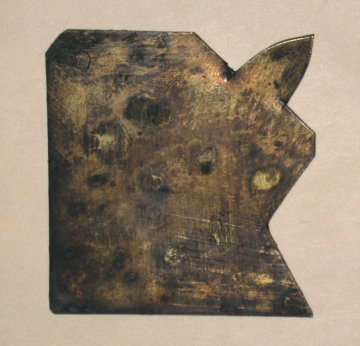
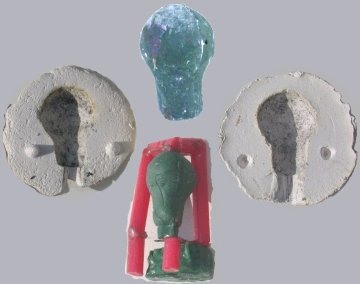 Top
center is the clay original, then the two part plaster mold used for casting
the lead, and wax cast from mold, sprued for better brass casting,
not yet cast.
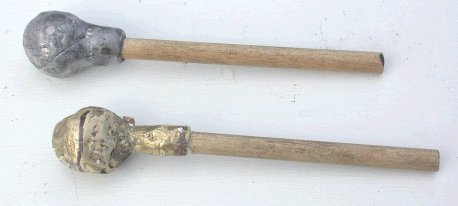
2008-01-12 In the next image the upper one was cast in lead in
plaster from the modeling clay original. It was drilled for the handle after
casting.
Top
center is the clay original, then the two part plaster mold used for casting
the lead, and wax cast from mold, sprued for better brass casting,
not yet cast.
2008-01-12 In the next image the upper one was cast in lead in
plaster from the modeling clay original. It was drilled for the handle after
casting.