|
I became interested in forging out of my glass work
in part because of wanting to make some metal shapes to blow into.
(Also, Foundry work.)
Forging Sources
A required catalog is from Centaur Forge
http://www.centaurforge.com/ which
has blacksmith, tinners, and farrier tools as well as equipment, books, videos,
and coal (if you can afford the shipping.)
A major source of information on the web is
anvilfire.com - Blacksmithing and Metalworkers Reference
Related to that is the Artist Blacksmith's Association of North America -
www.abana.org
In the Dallas-Ft. Worth area, most of the resources are near Ft.
Worth. Texas Farrier Supply 603 S New Hope Rd Kennedale, TX 76060
(817) 478-6105 has tools and coal has anvils. Verified 2006-08-14
Back in the distant past (1998?), I started
collecting stuff so I could do some forging. I found a place over
in Ft. Worth that sells actual hard coal for blacksmith work,
bought a couple of tools, read several books, built a flat tray
on legs to hold coal and take in air and attended a couple of
meetings of the blacksmiths and bought a small anvil. After a bit
of fooling around that is about as far as it went. More details below.
 Here is the anvil newly mounted on its 5'
pecan post after the previous 5 foot whatever wood post turned to punk.
I had to take a tree down in my backyard and carefully cut the
longest section of trunk for this purpose. The top of the anvil
is about 26" off the ground, so about 3 feet of the post are
in the ground. The anvil is held to the post with a thickish
steel strap across the feet with drilled holes and long (6-8")
3/8" lag screws into the stump. The top of the stump is
treated with boiled linseed oil. Since the anvil is outside, to
the right is the rough sheet metal cover that protects it when
not in use. 2004? Here is the anvil newly mounted on its 5'
pecan post after the previous 5 foot whatever wood post turned to punk.
I had to take a tree down in my backyard and carefully cut the
longest section of trunk for this purpose. The top of the anvil
is about 26" off the ground, so about 3 feet of the post are
in the ground. The anvil is held to the post with a thickish
steel strap across the feet with drilled holes and long (6-8")
3/8" lag screws into the stump. The top of the stump is
treated with boiled linseed oil. Since the anvil is outside, to
the right is the rough sheet metal cover that protects it when
not in use. 2004?
This is only a 65# anvil, but it seems enough for
me, especially when fastened to the post instead of loose. The
post was carefully positioned and the top trimmed with a router to make sure it
was level. The worst thing about the anvil is the 3/4" hardie [square]
hole for which no one makes fittings so I am forging my own.
 This fall (2008) the
pecan had turned to punk, so I contacted a
tree firm and asked if I could put in a request for a bois d'arc log 8-10" in
diameter and 5-6' long, which I could. Only a few days later they reported they
had one. They showed me a 9 foot long log and I pointed out where I wanted
it cut to my length and they loaded it. Very, very heavy and hard to move
with a hand truck over dirt. I dug out the old pecan remains. I considered taking off 6" of the log with long
branch blade on recip saw, but after trimming one end flatter, quickly decided to dig hole deeper.
Installed, the log is shown at right with an insert showing the roughly shaped
sheet metal that covers it when not in use. This fall (2008) the
pecan had turned to punk, so I contacted a
tree firm and asked if I could put in a request for a bois d'arc log 8-10" in
diameter and 5-6' long, which I could. Only a few days later they reported they
had one. They showed me a 9 foot long log and I pointed out where I wanted
it cut to my length and they loaded it. Very, very heavy and hard to move
with a hand truck over dirt. I dug out the old pecan remains. I considered taking off 6" of the log with long
branch blade on recip saw, but after trimming one end flatter, quickly decided to dig hole deeper.
Installed, the log is shown at right with an insert showing the roughly shaped
sheet metal that covers it when not in use.
Boi d'arc (horse apple, indian osage) is native to this area and has spread up
the Midwest. It is very dense and very bug resistant. The posts
supporting my house are about 80 years old and in good shape. It is a
yellow-green in appearance. 2008-12-05
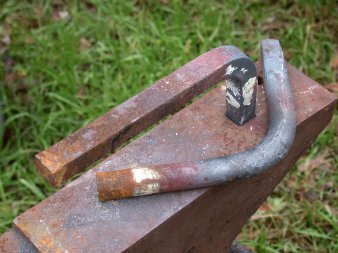
| These
two tools for use in the 3/4" hardie hole were made from 3/4" solid bar stock,
round and square to have smaller surfaces to work on than the anvil. I had
tried gas welding pieces to tubing, but broke it free on pounding. These
two were worked in the coal forge to bend in the middle and square, reduce and
fit the lower end. 2005-01-06 |
 |
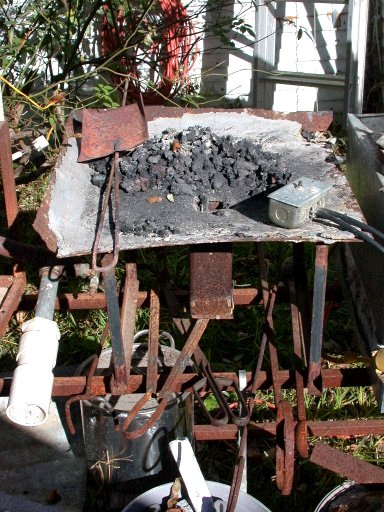
This is the forge. The coal forge design was scrounged from a couple
of online descriptions and is basically a square pyramid welded of 4 pieces of
1/8th
inch steel and turned upside down. What would be the point of
the pyramid has a square tube welded for air intake, coals
shaker, and cleanout. The tray was lined with concrete. A lip on the back and
side restrains coal from getting out. To show you the pace I sometimes work
at, when I went to my webpage on forging I found a note from 2002 (below) saying I
should try the push button on the blower and here I finally did it!
The shovel blade was made some time ago and the handle riveted on in this
session.
If you don't mind a small lecture, the problem with coal forges is
controlling the air, which controls the temperature. Continuous air burns
coal very hot and wastes coal. Manually valving the air distracts from
working the metal. What is wanted is a fixed rate of air that "coasts" for a
while and then dies off.
The traditional blacksmith's bellows has three wood panels making two
chambers with flexible leather sides: the lower half supplies
continuous smooth pressure and the upper half is lifted to renew the supply,
flap valves handling the cross over. The blacksmith can do a short lift for brief
air and a long one for more.
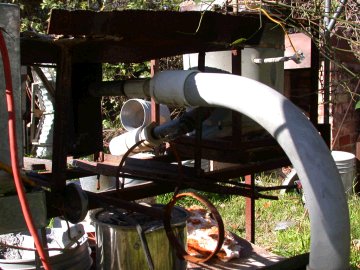
The portable way to do this (bellows being big) is a cast squirrel cage blower
that geared so when the handle is turned, it keeps spinning for some time.
Costs a fortune. I had actually cut a pair of 6" plastic tubes to make a
bellows, but the button works just fine now that I have used it. My air is
coming in the back of the square column in the center (which takes ash away)
through a sweep elbow of electrical (gray) conduit With the curve, the
blower (below) is positioned as with the glory hole and furnace and the slider
valve works easily. There is an joiner sleeve at the end of the elbow
and the blower goes in with a push fit. 2010-11-29
|
 |
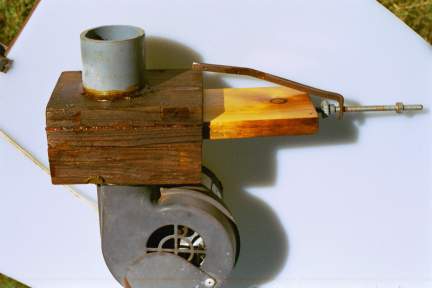
| Unfortunately, my simple design for a shaker is
bad and the air flow is hard to step up and down. I simply use
one of the blowers from my glass work. Either I need a manual
device that gradually slows down (a bellows, pipe pump, or hand
spun blower) or I need to counter weight my valve so that when I
open it, it gradually closes when I ignore it. [I am thinking a foot switch to
turn on the blower briefly might be useful 2002-10-12 Worked very well
2004-12-09.] Legs and cross
bars are welded under the tray so that it sits on a level
surface, most importantly in the BBQ grill space where its
surroundings are fire resistant. |
 |
 This is the spiral shaft after forging. The 1/4" rod is threaded into a
tapped hole in the end of the 1/2" shaft of the fan blades. Forging was about
as much of a challenge than I expected, getting the twist in place and working
it smooth, and getting the balance was a challenge. Even cold, I had to
jigger for several minutes of bending to get it centered.
Many blacksmiths and most farriers (horseshoers)
use propane forges more or less all the time. I have built a cylinder for use as a propane forge and
gloryhole, but have also done some coal work. I hope to do more.
Back to Site
Map
Contact
Mike Firth
|