|
FLAT GRINDER I wanted a grinder, but I wanted to spend a lot less money than commercial sources. A local machine shop would finish a 1" shaft and 1/2" steel plate for $115. Covington [Covington Engineering Corp., P.O. Box 35, Redlands CA 92773 lapidary machines and supplies] will sell me a 12" tapered iron plate for $163, a 1" shaft with bearings for $90 and a whole kit of 16" wheel, splash pan, bearing, shaft, pulleys and belt for $401 (no frame.) Complete units start at $1100 and go up. [Note: prices are at original writing - 1992-4] Much standard equipment is setup up for 1" shafts, including threaded wheels, but I decided I would work with less than that for lower cost. Experience told me that 1/2" shafting would be too light. I was reluctant to go to 3/4" because of the problems in making some holes. I decided to try 5/8", risking I would twist the finished shaft apart. After buying a pair of ball bearings ($10.30 each from Grainger), I decided that I would try using a threaded 5/8" shaft (which is weaker than a smooth shaft of the same diameter.) I bought the 5/8" threaded rod (all-thread) exactly 12" long at a local hardware store. Note also that professional grinders often have a thick enough plate that the center is flat, which allows working the glass across the center without the nut getting in the way. |
|
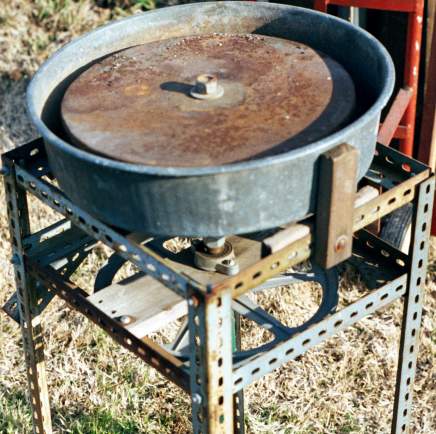
[WARNING: this grinder has been sitting out, covered, in the weather and looks worse than it needs to be. The crud on the surface will come off with a chunk of scrap glass and some grinding compound.]
For the frame to mount the bearings, I used pre-holed angle iron called Dexion that I had on hand, which is sold in hardware stores. [and in the version I had on hand is rather light, other styles are heavier.] If I had a welding rig [I do now], I would prefer a welded frame, but I wasn't willing to pay for welding, especially as I wasn't sure of spacing and ended changing it a couple of times. The bearings should be as far apart as possible, one as close to the 12" pulley as possible to take the side thrust of the belt. The other bearing should take the weight of the wheel, so that one bearing is not taking both the weight and the side thrust. (Actually, the weights and thrusts in my setup are so much lower than the capacity of the bearings as to be laughable.)
|
|
For my grinding surface, I went to a surplus iron and steel place and got a 3/8" steel plate cut from a chunk as flat as possible. The place wouldn't do any careful cutting, some will. If I had a torch [I do now], I might have tried to cut it round, but I gave in and paid a nearby welder to cut the circle. He simply center punched a spot and put a clamp-on pivot point (trammel?) on his oxy-acetylene cutting torch and made a neat circle. He came close to ruining the plate by pounding on it with a large hammer to break it free of the slag, before I stopped him (have yours pound on the scrap if need be.) Since the pan was 15", I had the plate cut to roughly 13". The welder ground the edges and some of the surface to get the slag off. I used his center punch point for my drilling. I drilled the center hole with the biggest bit I own, 1/2", and used a taper reamer to take it to 5/8" carefully from both sides, checking the shaft frequently for a tight fit. I decided not to key the plate, since I could do that later if slipping occurred [it hasn't] and it would reduce stress on the shaft if I only pulled down tight with nuts on the threaded shaft.
|
|
Total cash outlay so far has been about $55 because of all the junk I have around. The single most expensive part I didn't have to buy was the motor. Buying a motor can cost $90+. If a faster motor is used, 3450 being a commonly available speed, it becomes almost impossible to get the proper speed with only two pulleys. (Since the 1.5" I used is the smallest common v-belt pulley, the only way to get lower disk speed is a larger large pulley, meaning a 24" but that size isn't available, besides being awkwardly large.) The solution is a jack shaft where two pulleys are mounted on separate shaft with a belt from the motor to the jack and another from the jack to the grinder pulley. One choice might be 1.5" on the motor to 6" on the jack, then 3" on the jack to 12" on the grinder. The 2:1 ratio on the jack cuts the speed in half. But mounting the jack shaft requires more bearings, belts and complications. Grinding compound is needed. It can be bought from commercial
glass processing places (call a mirror and table glass grinding
operation and ask where they get it.) Commercial sources sell
silicon carbide grit for about $1-2 a pound in 50 pound buckets.
Wale Apparatus Co. [400 Front St. Hellertown PA 18055, 215-838-7047]
sells by the pound at about $5/pound for the coarser grits ($10
for 660 grit.) Check lapidary supply sources for grit. One local
Dallas shop stocks grit at $2.25/# or 9.50/5#. C.R.
Laurence (CRL) and Sommer & Maca (Somaca)
are national firms that supply the automotive and commercial
glass industry so an account must be established for online
purchasing. CRL sells grit (Silicon Carbide Grain) in 10 pound
minimums at $2.85/#, $2.02/# if 25 pounds combined is ordered.
Somaca has about the same prices, but the price break is at 50# |
|
Water is required, to distribute the grit and cool the glass. Commonly, a shallow metal V-tray is used with a low pressure water drip. The dripping water carries the grit to the wheel a few grains at a time. Part of the grit is normally wet so it sticks on the tray forming a dam with dry grit behind; the running water taking off the face of the dam. Especially with the coarser grit, it is common to recycle the sludge grit from the pan. Before using finer grits, the wheel must be thoroughly cleaned to avoid scratches. It is unreasonable to recycle fine grits as the sludge has glass bits mixed in. Another method of dripping is the preset drippers sold for drip irrigation. I have seen an absurd $50 being charged for a can with a small drip faucet on the side. If worse comes to worse, a can with a small hole, or a two liter soda bottle with a tiny hole in the lid will drip for a while For final polishing, after using two or three levels of grit, a felt and cork wheel or pad with pumice, etc. is needed. By far the best way to get a feeling for how much work is needed at each level of polishing is to do it with someone. My tendency was to use the pumice far too early in the process, trying to take out grit scratches that were too deep for pumice to work on. The general trend in glass working is to use diamond wheels and plates ($120) and diamond impregnated pads. Although the initial cost is high, if worked very wet, they cut glass faster and give a cleaner finish that requires less polishing effort. Without water, the plate can get hot and quickly damage the diamonds and the material that holds them in place. 9/20/95 A very similar design is being distributed by His
Glassworks which sells the plates and pads mentioned above. [Robert
Stephan, His Glassworks, Inc., HIS diamond lapping tools] His Glassworks Inc. diamonds
and glass |
|
|
|
Making a grinder yourself 4/5/93 (Narrative description) Go to your friendly local scrap steel place and have them pick up a piece of steel plate a half inch or so thick with their fork lift and torch cut a chunk about 18" wide off the end, ideally picking a piece about that wide. They will charge you by the pound with maybe a cutting fee. They will probably have a wide variety of impressively thick pieces to choose from -- don't go too thick. $7-15. Haul the chunk to your friendly local welder, after calling to make sure the shop has a circle cutting rig, which is basically a pin that clamps on the handle of a cutting torch. The welder should center punch the metal and rather swiftly cut a circle, pounding off the scrap (and not hitting the disk, you should ask) and may grind the rougher edges. Say $15-20 for this. Decide on the size of the hole. Buy a shaft, two bearings, and two pulleys. If the big pulley is keyed, get a key to fit. $20 Buy a 12" piece of all thread that size. Drill a hole in the middle of the disk. If you have the tools and are going for a reasonable size, do it yourself. If you are talking 3/4", 7/8" or 1", you should either pay someone to do it or already know more about this than I do. [By drilling several smaller holes around the circle and filing out the crud, it is possible to hand work a larger hole, barely possible.] When the hole is drilled, clean up the surface around it by sanding, grinding or filing. In the side of one end of the all thread, drill several holes in a row. The row should be the length of the key, the holes should be the width of the key and their depth of half the key thickness. If you can, try drilling sideways through the holes to take out more metal. Using a file, cutoff wheels, a Dremel grinder or other tools available to you, clean out the slot so the key fits. On the shaft place the following: 12" pulley, nut, washer, bearing, washer, nut, nut, nut, washer, bearing, washer, nut, nut, nut, nut, washer, wheel, washer, nut.
|
 For my drive system I decided to use one
of the most common motor speeds, 1760 rpm, helped by the fact I
had one on hand. Using nominal 1 1/2" and 12" pulleys
purchased from Grainger (pitch diameter 1.35 & 11.85), I got
201 rpm, within the recommended speed range of 200-220.) The 12"
pulley is keyed and I cut a keyway in the shaft by using a
portable drill to make a series of holes and filing between them.
[MF Awkward. I have since bought a couple of drill presses that
would have made the job much easier.]
For my drive system I decided to use one
of the most common motor speeds, 1760 rpm, helped by the fact I
had one on hand. Using nominal 1 1/2" and 12" pulleys
purchased from Grainger (pitch diameter 1.35 & 11.85), I got
201 rpm, within the recommended speed range of 200-220.) The 12"
pulley is keyed and I cut a keyway in the shaft by using a
portable drill to make a series of holes and filing between them.
[MF Awkward. I have since bought a couple of drill presses that
would have made the job much easier.]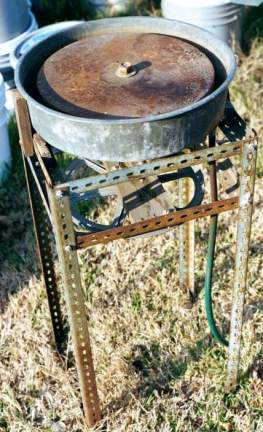
 To assemble the grinder, I mounted the bearings on plates (wood
in my case) and after placing the 12" pulley on the slotted
end of the shaft, added the bearings and nuts alternately. Using
the shaft with all the nuts tightened as a guide, I bolted the
bearing supports to side frame rails and assembled 13" frame
pieces and 30" legs to fit around the shaft.
To assemble the grinder, I mounted the bearings on plates (wood
in my case) and after placing the 12" pulley on the slotted
end of the shaft, added the bearings and nuts alternately. Using
the shaft with all the nuts tightened as a guide, I bolted the
bearing supports to side frame rails and assembled 13" frame
pieces and 30" legs to fit around the shaft.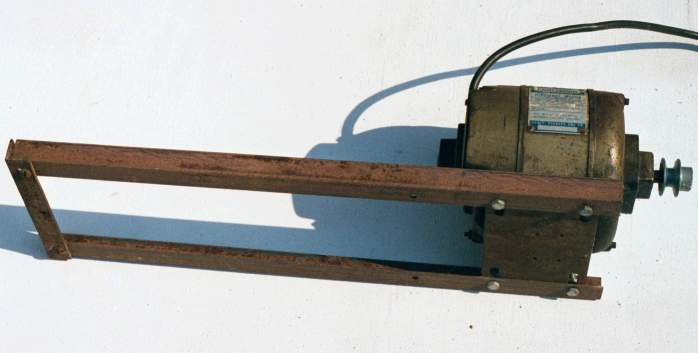
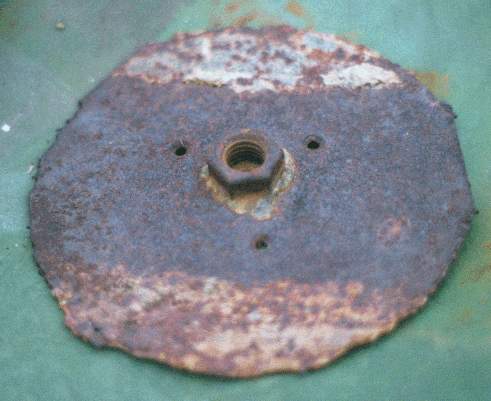 This is a rather crude
addon plate made from a rough
cut of 1/8" steel and a braised on 5/8" nut. What was
done carefully was the drilling of a center hole and the three
hold down screw holes. A circle was scribed, the locations marked
(2 radii) and the centers punched before drilling. What I have
used it for is making the grinder do duty as a lathe. I glued a
Styrofoam block to a piece of plywood and screwed the plywood to
this unit. This was then turned on to protruding bolt of the
grinder. As the grinder spun, I was able to carve the core for
casting my gloryhole, including the under hung lip, getting a
perfect cylinder out of it.
This is a rather crude
addon plate made from a rough
cut of 1/8" steel and a braised on 5/8" nut. What was
done carefully was the drilling of a center hole and the three
hold down screw holes. A circle was scribed, the locations marked
(2 radii) and the centers punched before drilling. What I have
used it for is making the grinder do duty as a lathe. I glued a
Styrofoam block to a piece of plywood and screwed the plywood to
this unit. This was then turned on to protruding bolt of the
grinder. As the grinder spun, I was able to carve the core for
casting my gloryhole, including the under hung lip, getting a
perfect cylinder out of it.