Hot Glass Techniques

2003-01-04 Rev. 2003-06-05, -06-24, -07-02, -09-05, -11-23
2005-02-16, 2006-06-20, -07-22, -08-31, -09-30, 2007-01-31, -04-20, -06-08,
2009-01-26,  2010-02-20
[Search on date pattern to find latest changes, more than one may be found.]

Sitemap

V=Video  NW=New Window  NP=New Page
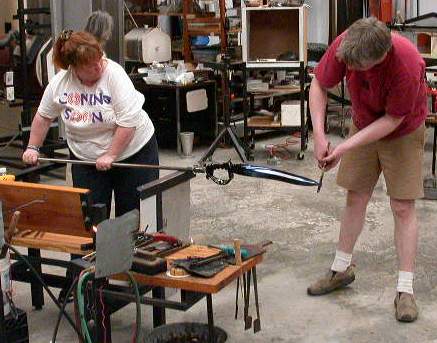
Third Arm - Working solo
One Gather
Goblets
Mass production hand made
Wood Mold Working - NP
Mark Boutte working a goblet
Colin Heaney working with wood sticks
Steam Stick & Air Cone
Ring Bubble, RISD Ring
Martin Blank - Huge solid piece
Merrilee Moore at Pratt, GAS 2003
James Nowak making a large platter
Karen Willenbrook-Johnson solid sculpture
 Rollup demo at Eastlake Glass, WA
Flattening a piece with cork pads
Steps in blocking a piece
Changing axis of piece
Threading, Cane & Stringer - NP
Drew Ebelhare Makes a Weight -NP
Other sites with demo pages
Stephen Powell makes Johnson bag
Stephen Powell other techniques
Reticello & other Venetian
Scavo bowl
Woven Glass
Using Pie Dividers & Calipers V NW
Various Techniques
European Virtual Training Centre
for glass arts and techniques
  V NP
Making a tall thin animal's legs by making a squat
animal, putting a blob of clear and stretching

Davide Salvadore in Tulsa  V


This page shows various pieces of glass created from furnace glass and discusses possible or actual techniques for making them. Some of the glass is commercial and therefore the actual technique may not be known.

2003-06-05 Posted by MF to Yahoo Glass discussion
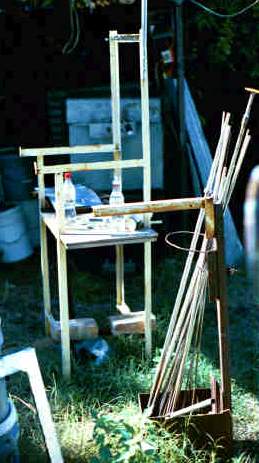
Outdoor work bench with third arm and pipe holder  WORKING ALONE -Picture at right showing my bench and its third arm. [benches] The 3rd arm is a freestanding box with a ring into which I dump my hot punties and pipes, but it also has an adjustable height right angle that is matched to the arms on my bench. There is a pipe hanger which is a V fold of metal above the bench.
  Transfer goes like this: Chill the jack line, reheat the bottom, hang the piece, grab a hot punty, gather the bit, marver, blunt and chill the end; lay the punty down on the middle arm with the bit to the left using the right hand while grabbing the hanging pipe with the left and pivot it down left to the piece is to the right. With the right hand, pick up the diamond shears and with tips, pick up the punty near the bit, sliding it to the right to get it out beyond the piece; use the left hand to roll the piece, bend over and spot the center and slide the hot bit into place; adjust the punty to center (you didn't think I hit center every time did you?); change hands with the shears and take the punty in the right, squeeze the jack line with the shears (wet or not), test the punty - I tend to be hot, so it has time to cool, set the jack line on the arm edge, tap the glass twice with the edge of  the shears and whack the pipe about 6-8" down. When it breaks successfully, set the shears down while controlling the piece on the punty and if time, grab the pipe and drop it into the bucket under the 3rd arm. Simple, unh!
ONE GATHER - I keep working on thinner, etc.  People who do pieces with 1 gather have the following tricks - relatively cool glass in the furnace, a bigger head on the pipe - some goblet makers use a 1.5" head on a .75" pipe.
If you recall my setup, my yoke has the transfer balls attached in a V cut in a steel panel which acts as a heat shield very nicely. But it also means that there is a flat surface on either side of the V, so I can lay the pipe in the V and roll it easily and lay a hot bit on a punty in one of the rough notches (it was torch cut when I was learning) on the top and roll it there. Thus I can reheat piece and punty for another attempt at transferring to a punty or I can reheat a color or clear gather being used to add a hot bit or stringer to the piece. With a standard yoke, I have seen solo workers cross the pipe with the punty, so the punty is laying on the pipe near the moile. This requires the door be open more or be bigger.
Making: Goblets
Where: CraftWeb discussion
Special Equipment: None
2002-09-21  In a discussion running on CraftWeb, guys who make goblets say that having the glory hole relatively cold gives more time for working the piece without the bowl collapsing.

2003-07-02 In another discussion of making goblet feet, several points are made.  Four hours of just making feet on stems on a punty (no bowls) will insure perfection of whatever method is used.  Besides the wooden footer, and the fancy tool from Emenese, one person is reported using a small (3x5) thin (1 sheet) newspaper pad with success.  Several people form a gather made on the stem itself, no cookie.   If using a cookie, reheat to the softest that can be handled and really squeeze it down while turning quickly.


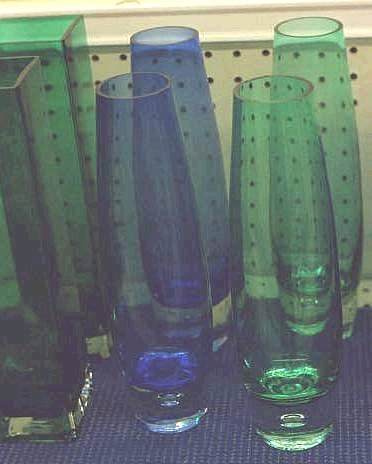
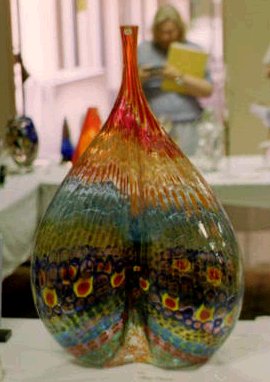
Ground top vases, color lined, bubble in bottomThese two sets of pieces were photographed at Elliott's Hardware, where I work. Each is an example, I think, of the best that can be produced by low cost, mass production hand made techniques, unfortunately by low paid people. The colored vases require gathering a small amount of color and gathering a larger amount of clear, and doing the initial forming. The bubble in the bottom was almost certainly formed with a simple centered mold with a blunt spike (because of its size and uniformity.) Then another gather of clear over the indention to form the bubble and final forming of the glass. Both of these sets of pieces have ground tops, which means they are probably not transferred to a punty and not reheated. The square vases are clearly mold blown and have no bubble in the bottom. Another vase like the ones on the left has a round top and four lobed base, the base being formed by letting the hot glass flow between four steel pegs.
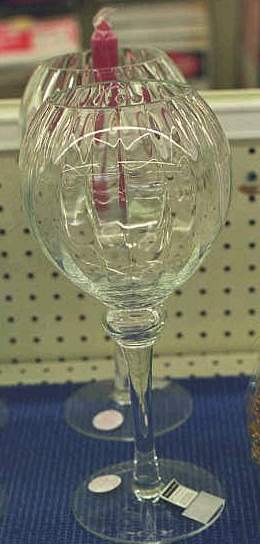
Ground top, optic molded GobletThe pieces on the right were probably made in two sections, the top being mold blown and then inflated, while the foot and stem were molded and attached hot. Again, the piece has a ground lip. It was either annealed on the pipe or cracked off well above the lip line. 2000-11-06.


Notes on how a team might make bottles in production situation, written down for woman who was asked to make 12,000 750ml bottle twice a year. on CraftWeb


TRIM THE RIM -  I have been told that one of the most difficult things to do is to thin out the lip by pulling the lip and trimming if it is too thick.  After freeing the piece from the pipe, the rim may be to thick if jacked in the wrong place or if not blown out at the jack line.   If you heat the lip hot, you can take tweezers or diamond shears and pull it lengthwise in several places - this will give you a thinner, ragged edged lip, which you reheat.  Then using cutting shears, you start cutting at the bottom, turning the bottom toward you, so the peel falls down and away from the glass.  If you are quick, it can be done in one move, but more likely you will feel the glass harden under the shear blades, so you will turn and cut off the peel, letting it fall to concrete floor or metal pan and reheat the rim to finish the cut. On the next reheat the cut edge will smooth and if evenly done, spinning or shaping will be much easier than fighting with the thick glass. 2007-04-20

Making: Classic bubble on bubble goblet
Artist: Marc Boutte
Where: Divas studio, Ft. Worth, open house demo
Special Equipment: Delicate shears
Goblet technique shown by Marc Boutte at Divas Art GlassMarc Boutte working a goblet in the classic Italian style at Divas Art Glass south of Ft. Worth. Here we see a late step in making the goblet - placing the bubble that will form the foot. The steps so far involve creation of a the first bubble that will be the goblet bowl, just above the pipe mouth in the picture. Above this is a small blob of solid glass and a second bubble for the stem, followed by another small knop of glass. The bubble being applied will be nipped off, heated and evened and opened to form the foot. All the glass is thin. The lip is worked by either puntying the goblet or with a goblet gripper with prongs that hold the foot.


Making: Flat sided pieces
Artist: Various
Where: Various
Special Equipment: Cork Pads, thick with handle, wood
Colin Heaney working with wood sticks.Colin Heaney working a piece of glass with wood sticks. (His site.) Using wood to shape glass is a common technique.  Wood is most often fruitwood, notably cherry, soaked until it is waterlogged, so shaping is done with a fair amount of steam protecting the wood from burning.  Cherry wood dowel rods are available from woodworking supply houses. Besides forcing the glass in to new shapes from the outside, wood dowels can shape lips inside and out and a form of jacks takes wood (or paper) fittings. Blocks of cork are also used for flattening sides or forming a squarish shape.

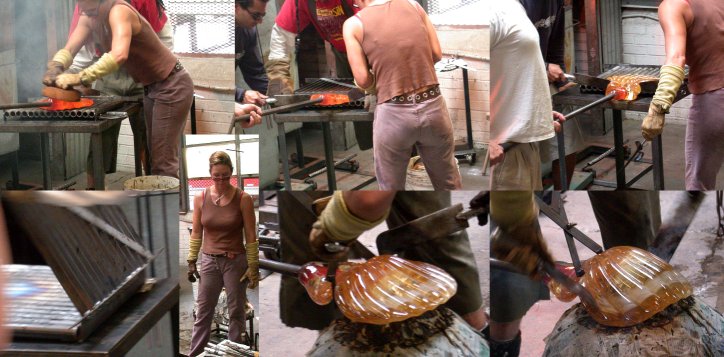
The sequence of images of the Marilee Moore demo (below) starts with a picture of her using cork pads to flatten the piece.

A piece can also be flattened or given multiple sides by letting it sag onto the marver, lifting and rotating 180, 120, or 90 degrees for 2, 3, or 4 sides, and laying it down again. 2006-07-22


Making: Using wood and cork blocks to flatten the sides of a piece.
Artist: Lino Tagliapietra
Where: Philabaum's, GAS Tucson

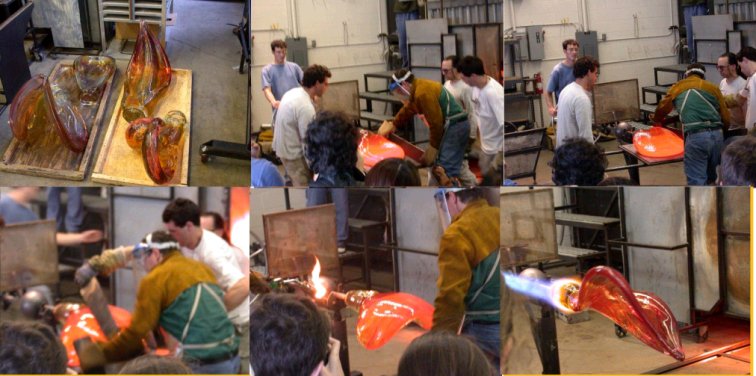
In the sequence, the first image shows the original shape of the piece before applying the blocks, which is shown in the next two images. Finally, below there is a picture of the piece showing its thinner, flatter appearance. 2006-06-20  Longer narrative on piece

Lino Tagliapietra working an elongated threaded piece
Lino Tagliapietra working an elongated threaded piece Lino Tagliapietra approaches to cork sides of elongated piece
  Lino Tagliapietra flattening sides of an elongated threaded piece
   

Steam Stick & Air Cone

"Steam pressure has been used for blowing or re-inflating a piece on the punty. This is done either by pushing a wet stick through the narrow opening of the form or by holding the opening down over a damp surface, a wet board, or a pad of wet paper.
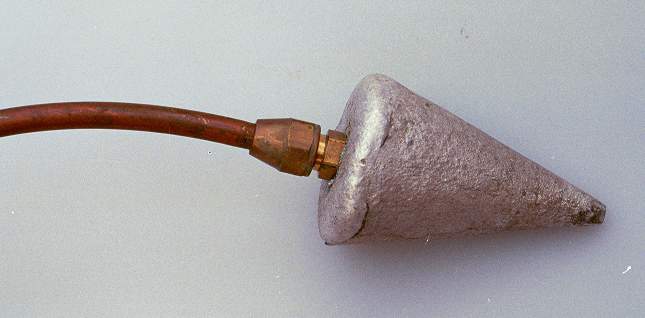
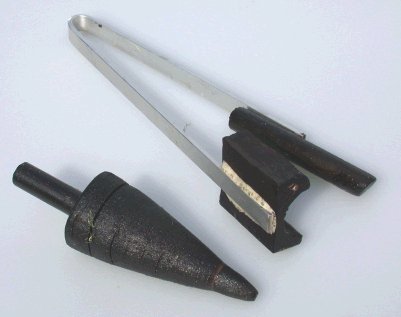
Puffer with home cast head drilled and threaded to copper tubing via standard flare adaptor fitting

"Air pressure, from either a simple mouth-blown conical tool or an air hose, is traditionally used to inflate a form. The conical end of such a tool fits a variety of openings, and when it is forcibly held against an opening and air pressure is applied, the form can be expanded. This process has been used both to inflate a form that has been broken from the pipe and to start a piece gathered on a punty. In 1962 Jean Sala gave me a tool similar to those I later saw used in Murano. Sala’s, however, had a simple right-angle bend to make it possible for him to use it alone.

"At Steuben the cone is made of wood and is on the end of an air hose with a simple finger valve so that the gaffer or head of the hand shop can use it without aid. There I saw it used to open out the top of a high bowl. After the piece was broken off the pipe and warmed in the glory hole, air pressure was used to open up that thick area of glass near the rim. Normally, such a form would be slowly opened out with the jacks and the wall would never be pulled outward from the base. But the entrapped, expanding air bubble pulled out and thinned the wall farther and farther toward the base. This is quite a different action from the stretching outward of the edge with a jack or even the spinning out of a form with centrifugal force."
"Glassblowing, A Search for Form" by Harvey Littleton

Examples of glued wet wood tools

While taking the class in 2003 with Fritz Dreisbach, I learned that the steam stick or steam cone needs to be rotated with the piece to keep the seal.  Therefore the handle to the steam stick should be small enough to roll with the fingers.  Fritz used a ricer pestle that is smaller than I was able to find on several shopping trips so I turned one in cherry. Blocks Wood & Paper  During the 2003 GAS, one studio shaped a large bowl form by putting a pad of wet newspaper on the floor and lowering the rim onto it, so the steam inside swelled the walls.  It was not turned. MF 2003-07-03


Ring Bubble, RISD Ring

Posted By: Kurt <krw@kurtwalrath.com>
Date: 2/17/2001 - 4:22 p.m.

In Response To: How does he DO that? (Patti)
: http://www.gaiser.org/forums/DCForumID2/552.html #
: Mark Matthews has quite the marble reputation - he's been doing these bubble things like this one (hopefully the link
: works), also does numbers in them. Any ideas?

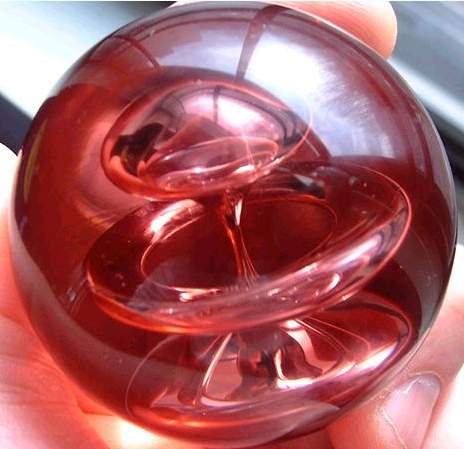
Mark Mathews Pink Jetson (from site selling one)(Click for larger view)You could make a marble with a trapped bubble down the middle then use a pair of jacks to neck a line in the middle of your form until you have squeezed the bubble almost into 2. You should now have an hourglass shape with the bubble similarly shaped inside. Heat up the "waist" of the hour glass and use a wet newspaper to push the inner fold closed. this will trap a ring shaped bubble around the first bubble.
Reheat and shape into a marble.

This is how I would do this using hot glass techniques and tools, I'm sure it can be accomplished using similar lampworking tricks.

The neat ring shaped bubble effect is the solid work result of a glassblowing trick called an "interior fold" or a "RISD ring". This is the first time I've seen it in a solid piece and it's pretty cool looking.

I'd like to see a photo of one with the numbers.


Bob Johnson wrote in message <3a992ec2@news.qnet.com>...>Hi all
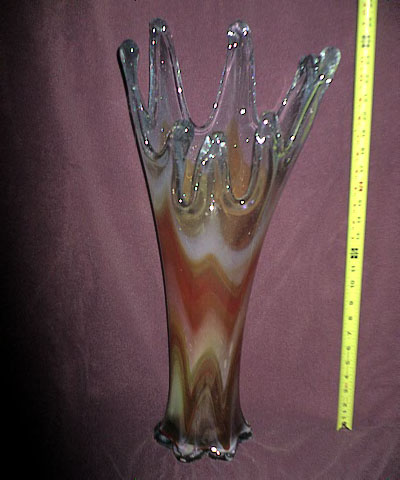
>  Had this vase in family for many years.  It's hand blown and 25" high.
>Still don't know what type or, from who or, when.  Any info greatly
>appreciated.
>Bob

Click for larger image.I turned at  first to "Popular '50's and 60's Glass" by Leslie Pina to cross check, because I had been surprised at how much some of the commercial glass echoed what was done in the studio glass movement.   On a closer look at the picture, I would say it could have been made in any studio from the 60's on.  If you can date more accurately "many years" you might be able to raise its value by attaching it to a particular artist.    I note that it is easy to make (pull the prongs then remelt to take off the pull marks) and it appears to be not particularly well made - lacking proportion and symmetry and being rather top heavy.  Because of its size it might be worth a few hundred.  

Depending on whether the inside is all white, and it does not appear to be, the piece looks to have been made by picking up several disks of color on the end of a gather of clear and blowing through them to form the lines of color. After a further gather of clear over the color, the bottom was pulled, distorting the color downwards, but giving a clear end to the toe. The bottom was squared off, perhaps in rod form, and the piece was transferred to a punty and the top reheated. The top edge was pulled, perhaps after cutting into lobes, but stretching the upper color as shown in the center front and left and the rear. The piece was reheated to round off the pulls and soften the tool marks, but little effort was made to form the pulls either inward or outward, to give it a base form. It may simply have been hung upside down after reheating and left to solidify before being placed in the annealer. This form would require hot gloves to get it safely in the annealer, I think. 2000-02-25


Making: Very Large Solid Sculptural Pieces
Artist: Martin Blank
Where: His studio, demo during GAS Conference 2003
Special Equipment: Massive pivoting punty on yoke with large control wheel
             Annealing oven with special door to allow piece on punty to extend out under closed door
             Large shaping block with cross handles brought to work by two people.
The two assemblages of photos below follow the work of Martin Blank (in brown) and his team making a VERY large solid piece for his sculpture work.  The glass is so big a special punty, clamped to a yoke, with a large wheel is used for turning.  The shaping block is brought to the glass by two people (second row) and a large oxy-propane surface mix torch is used for punty heating. When the clamp is released to extend the shape (row 2, pic. 3), control is tricky. A heat shield guards the bearings of the yoke. Row 4 shows some finished pieces and the steps in flattening (with a lifted platform) and final shaping of the piece, with a pulled tip.  The whole unit is inserted in the annealer to even the temp, with a slot in the door for the punty and when even, the piece is laid on the floor of the annealer. 2003-06-24 rev. 2006-06-20

Martin Blank's large piece being worked - Composite of 9 images

Martin Blank's large piece being worked - composite of 6 images.


Making: Large seashell sculpture
Artist: Merrilee Moore
Where: Pratt Institute, Seattle, demo during GAS 2003
Special Equipment: Press made of pipe to form ribs
                    Mound of wet newspaper to form curve over.
                    Large cork pads for flattening
Demo by Merrilee Moore at Pratt, GAS 2003, making solid glass shell with special marver/press shaper and mounded newspaper cone.  Prior to the first picture, the glass was built up in volume and colored with frit laid out on the marver.  The blob was then flattened on the flat marver and reheated prior to placing it on the hinged grid. 2003-07-03 (Larger images at GAS Conf. page if still available)

Marrilee Moore at Pratt making a solid shell piece - composite of 6 images.


Making: a large platter with included color, rolled pickup, metal leaf, optic
Artist: James Nowak
Where: His studio, Seattle, demo during GAS 2003
Special Equipment: Shallow color pickup oven, large optic, large marver.
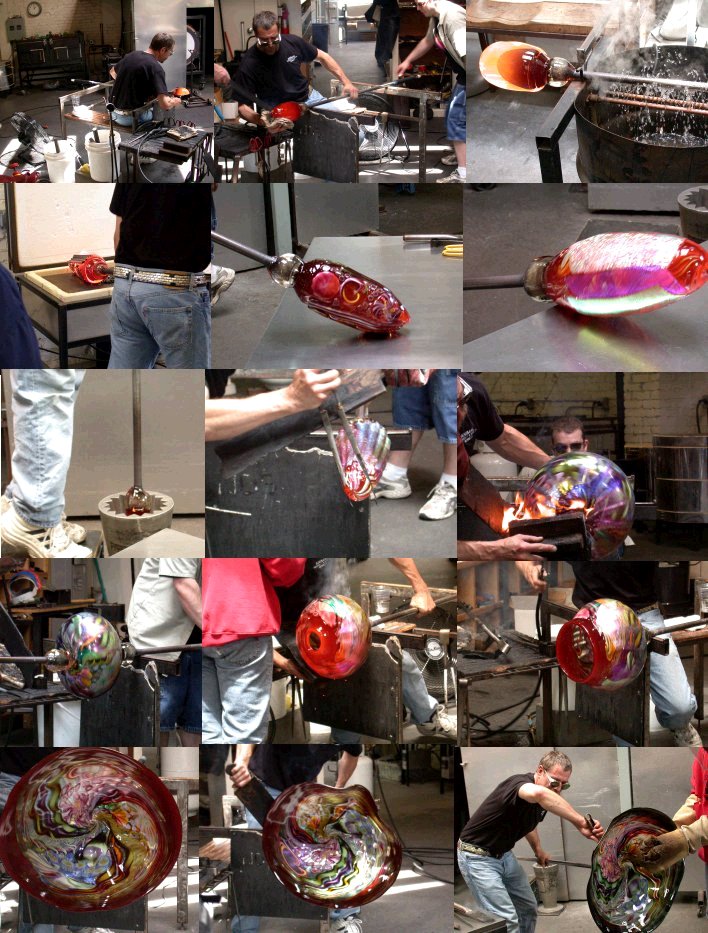
James Nowak making a large platter with included color, rolled pickup, metal leaf, optic.  Note the very shallow kiln (row 2, frame 1) for preheating the roll-up.  Among the tools not properly pictured is a small Hudson-style (pump-up) sprayer with water to soak the very thick paper pad he uses.  The cooling barrel (1,3) is automatic, coming on when the pipe is laid down. The jacking of the post-optic piece (3,2) is removing the not very interesting end (2,3 before optic) so the detail runs to the center of the base. (Larger images at GAS Conf. page if still available)

James Nowak making a large platter at GAS 2003


Making: Rollup Vessel
Artist: Team
Where: East Lake Glass, Seattle, demo for GAS 2003
Special Equipment: Kiln, kiln formed glass,
These are shots of a rollup where a kiln formed sheet is wrapped around a heated billet - glory hole without furnace.
The murrini technique can produce similar results although it tends to repetitive design details instead of pictures.  Murrini are partly fused in glory hole, but are always picked up on a glass shape prepared for the purpose as shown in Powell pictures.
At left the fused panel has been heated in the gloryhole on a kiln shelf, perhaps overheated as it stuck a bit in spite of the kiln wash.  It was not setup on the kiln shelf and fused in the glory hole, but was fused in a kiln, perhaps in several steps, I did not ask.  In the center, the proper sized gather has been formed from a block of the same kind of glass (the melted glass in the studio was incompatible and besides the point of rollup is to add a glory hole to the kiln but not need a furnace for molten glass.)    The glass of the panel may have gotten a bit stiff during the fighting to get it unstuck, because the roll is not complete and not successfully stuck all round to the moile  All is not lost, as the edges are worked together in the last image and progress is made with sticking the rim.  I have seen videos of the process which are smoother than this. 2003-07-02


Rollup being demoed at Eastlake Glass, Seattle GAS 2003
 
Karen puts final touches on eagle with oxy-propane torch for reheating Making: Eagle sculpture, flower, sword
Artist: Karen Willenbrink-Johnsen
Where: Houston Studio Glass, special demo
Special Equipment: Garage to park parts
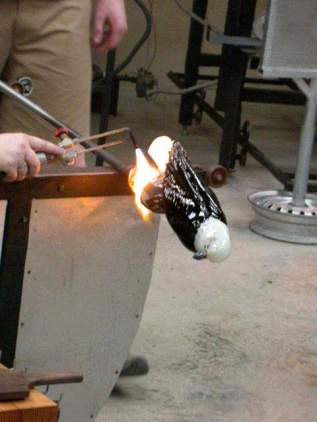
Karen Willenbrink-Johnsen's demo was on when I arrived "early" and this is a shot near the end of the completed eagle. The wings, folded on the back, were made first and garaged, then a textured rock was made and puntied and the eagle built up on the rock, with the head shaped at the end with details added with a torch and stringer. The torch shown in the picture got a lot of use, it is an oxy-propane torch, being hand held instead of bench mount. lots of heat.
The second demo was done by Jason Willenbrink- Johnsen, making this cutlass style sword. The handle was built first then the blade and the two were merged by heating locally with a torch. The blade was then further shaped. Because the color of the blade comes from powder on the outside of the gather, when the tip was sheared, it showed the clear glass and had to be pulled and shaped as here, to get the color back to the tip. Karen assists Jason on the sword being stretched.
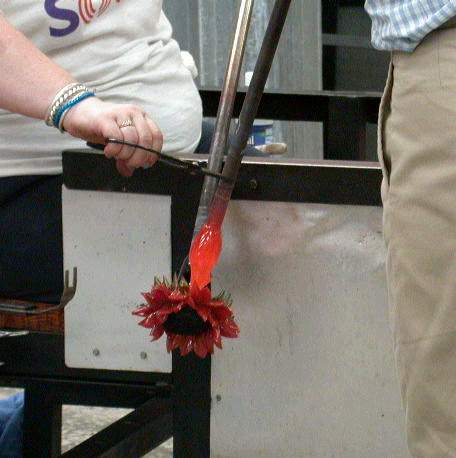
Karen works on a sunflower This sun flower was Karen's second demo. It was built with a seed pod made by picking up frit. The petals and green outer leaves were applied as hot bits, each one being cut off at an angle, then cut in half lengthwise and shaped. In this picture, more green glass is being added to form the bud base of the flower (and later the stem.) Of course, the green glass glows red in the picture although the greenish colder leaves can be seen below it.

Making: Standard hollow ware shape with blocks
Artist: Chris Marrs
Where: His studio in Texas Hot Glass
Special Equipment:  Various sized wooden blocks.
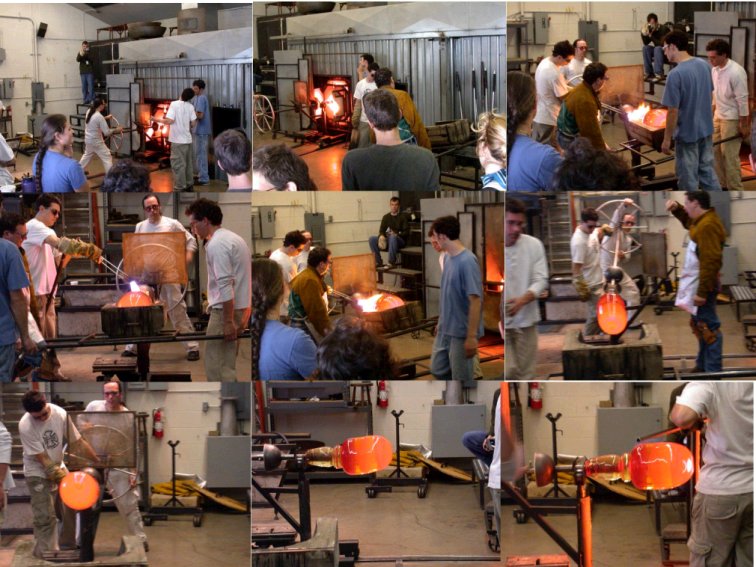
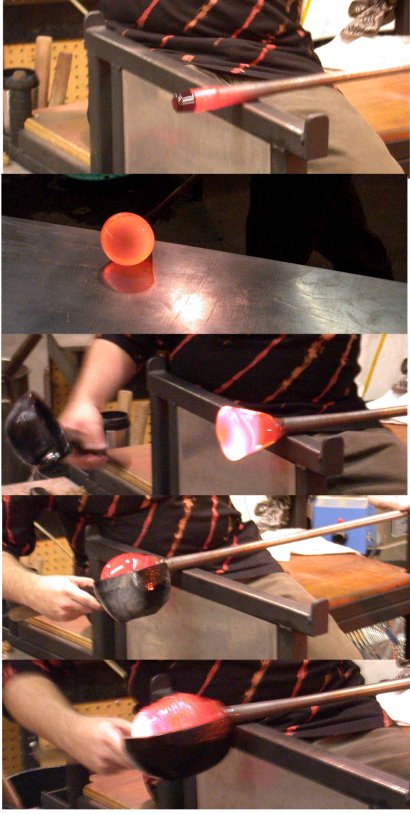
Chris Marrs working glass, as a demonstration of blocking.These pictures, taken while Chris Marrs was demonstrating at Texas Hot Glass in Dallas, show the steps of forming glass including using blocks.

In the top image, the end of a heated pipe has been pressed down on a chunk of color in the color oven.  The remaining layer of glass on the end of pipe adheres the chunk which is then heated and rolled on the marver to shape.  The color is dark here because of the chilling from the marver.  It is checked for good adhesion.

In the second picture, a gather has been made over the color and brought to the marver for shaping, moving the glass up off the pipe and around the color and making it symmetrical.


In the third image, a second gather has been taken from the furnace and by carrying it pointed somewhat down while turning the glass has flowed to a cone shape.  A block of medium size has been picked from the bucket of water and is being brought to the glass, the glass being turned constantly.


Next the glass is being blocked to shape, chilling the surface for blowing.


And lastly, after another gather the hot piece has been rolled in mixed colored frit laid out on the marver and a larger block is used to work the color into the surface. 2003-11-23


Stephen Powell piece donated in Tucson, GAS 97Making:  Giant murrini colored bag
Artist: Stephen Powell
Where: Phillabaum Studio, Tucson, AZ, 1997 GAS Conf. demo
Special Equipment: Pipe mold, tall blowing bench, pastorali, large pipe cutting tool
Special Prep:
Process: Pull brightly colored thick cane with darker outer bands
    Slice cane into evenly sized murrini about 1" across and 1/8" thick
    Arrange murrini into rows of similar colors on pastoralli and preheat on hot plate
    Before cylinder of glass is ready, further heat plate in glory hole and just before rolling, super heat top surface with torch.
    After further inflating, finish shaping by blowing down against V shaped pipes on plate.
    Use a pipe cutting tool to remove glass to avoid risks of cracking off.
Result: a large bag shaped bottle with strong stained glass colors and reminders of human buttocks and breasts shapes.


Stephen Rolfe Powell - Blown Glass Process  
Stephen Powell picking up murrini for bag pieceStephen Powell picks up the Murrini (cane slices) that form the stained glass colors in his large blown bags which calls Johnson. The hot clear glass is about an inch thick. The diameter of the hot glass was carefully measured to match the length of the roll up so the edges would meet (if they don't or do it badly, he makes a different style of piece, I asked at GAS Asheville.) The plate of murrini is preheated in the glory hole and heavily torched before the cylinder is applied.  [His site showing step by step technique http://www.stephenrolfepowell.com/process/process_01.html ]

Stephen Powell doing final blowing of bag pieceNear the end of making the piece, it is inflated between two angled pipes to form the bag shape and set the bottom. The neck will be cut with a very large pipe cutter.


Stephen Rolfe Powell other techniques

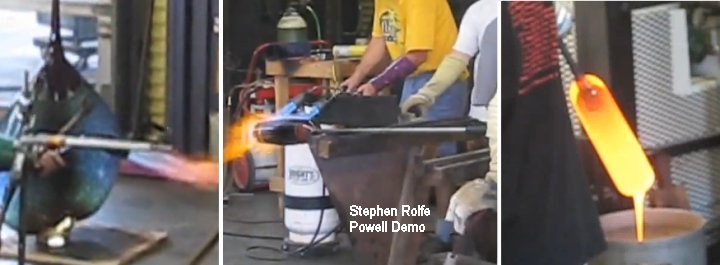
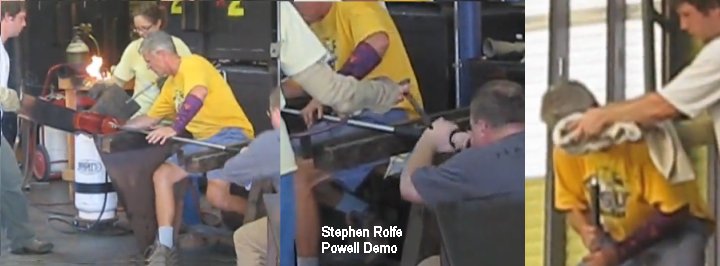
This YouTube video shows many steps in making a similar bag shape with a lot of team activity.  The following images were taken by screen capture of some details I wanted to point out, including torches, draining, rollup, keeping cool, teamwork,  special tools and where the gaffer can be found.. Stephen Rolfe Powell is the gaffer.

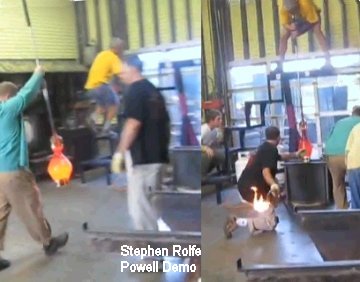
Torches appear at several points in the video, three of them are in the two panels below.  These large torches put out a lot of heat. The first image below shows the torch used at the end of the process in front of the final piece, while the center image shows Powell (in yellow) working two torches to selectively heat the middle of the piece for further blowing out. Also note the pipe end being lifted to let gravity assist the shaping and the heat blocking panel held by the gloved hand to protect Powell's bare hands. The right image shows glass draining from the core that is worked for the first part of the video.  It has been cooled considerably to hold its size and shape for the rollup shown in the next panel. Imagine how big the furnace supply of glass must be to dip this whole thing into the pool of glass. 2010-02-20
Torches and draining glass by Stephen Rolfe Powell's team

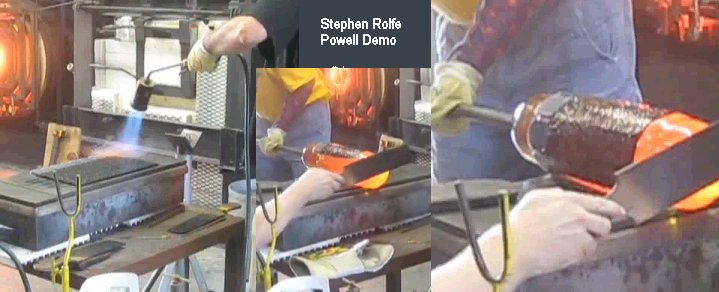
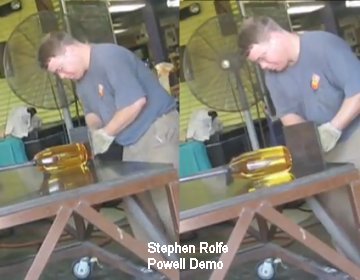
A key to Powell's design is construction of a matrix of murrini that creates the net effect at the end.  This is applied by precisely shaping the cylinder shown worked in the first part of the video so that when the rollup occurs its edges meet exactly. In the left image the panel has been put on a hot plate and is torched along one edge, perhaps because the hot plate is a bit cool there as he does not sweep the torch or because the pieces are bigger.  Note the yoke just behind the hot plate which is used to support the considerable weight of the pipe and glass between the draining and the rollup - the resting is actually hidden by a worker's body in the video.  The cylinder covered with molten glass shown draining above right is brought to the edge of the panel and rolled to pick it up.  The narrow board  is flattening the soft glass at the end.  Notice in the image on the left above that the end remains clear and is resting on a board to support the piece and flatten the end for standing.  2010-02-20

The panel below shows several items related to cooling and team work but note in the right image above that Powell is using glove and wears an arm guard while handling the large mass with molten glass on the outside, but is bare handed below.  This is because he is using a wet paper pad for shaping and cooling the glass and the wet glove would be a problem.  In the left image the woman in light yellow is both holding a panel to protect Powell's arm and using a blow nozzle on the glass.  The same nozzle is cooling the person helping turn the pipe and blowing to inflate the glass watching Powell's hands for direction.  Near the end of the video a towel helps control sweat.  2010-02-20

The two pairs of pictures below show special rigs and devices included in the video.  On the left Powell climbs the built in steps to the platform for bending over and blowing the hot glass being carried as he climbs. The platform is purpose made to do the job, unlike the stack of tables in the demo above. Just below him is the steel sided box that constrains the glass as he blows to make the bag shape.  On the right an assistant holds a steel plate with a grip on the back and follows the rolling of the cylinder to flatten its end square with the sides. 2010-02-20
Stephen Rolfe Powell assistant using small movable marver plate


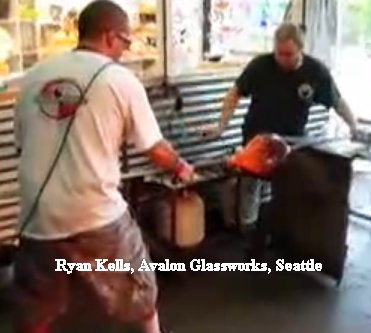
Ryan Kells, in an image from this YouTube video showing another tricky use of air.  The piece is being pulled to stretch the neck but just pulling will flatten the hot part.  So the pulling is being done with a blow pipe heated and attached to the open end and the person on the left has in his mouth the end of an air tube end which runs over his shoulder and down to the end of the pipe to a pivot connection so the pipe can be turned with the piece to keep from twisting the glass while pulling and keeping pressure on the piece. 2010-02-20

Reverse Axis or Changed Axis Vessels

Making:
Artist: Various including Alex Petrakis glassblowing Reverse Axis and Lino and Starfish
Where:
Special Equipment: None if torch is standard.
  Reverse or changed axis vessels provide a way to use techniques which wrap threads around a piece to provide details which in the final piece run end to end or otherwise offer variations in patterns that would be much more difficult to apply.

  The basics of the the technique are that a piece is partially blown, shaped and opticked if necessary and then is threaded placing many fine lines around the piece in one or more colors.  Further work may be done, but the shape is still a roundish bubble.   A hole is then made in the side of the piece either by heating a spot with a torch and piercing as in the Petrakis video or by blowing out the hot weakened spot.  An alternate spot heating method normally used before torches were common is to get a blazingly hot bit and putting the blob of glass down on the piece, thus heating it very locally and weakening that area so it can be blown out.  The bubble or fragments around the hole are knocked off and the piece reheated so the hole can be evened up.   Meanwhile, a pipe is prepared by doing a small gather and blowing it out so it is a hollow ring (donut) on the end of the pipe.  This is reheated and flared if necessary to match the size of the hole in the piece.  The piece is necked and the new pipe stuck up firmly on the hole, more firmly than a punty is normally applied.  The first pipe is cracked off and the piece heated and centered.
Steps in repiping to change axis taken from Alex Petrakis video
  What happens next depends on the design goal.  Something has to be done with the rather sloppy pattern around the hole left by the first pipe and the hole itself.  The sloppiness of the pattern may depend on how carefully the necking to the first pipe was done, thus how much extra glass was left.  The hole is normally worked closed keeping the shape of the piece, but one of Lino's 'tricks' is to stretch the piece out so the hole is closed in one point and the circle of threading that was away from the first pipe is at the end of the other point. 2006-07-22


This page on an Australian site has a long series of drawings showing how the artist builds up the metal foil on the hot piece and then puts an image onto the piece Hiroshi Yamano glass blowing 2002-04-04

Google Video yields a number of video demos under a search of 'glassblowing'  and  'glass blowing'  including a video from dog house films of this artist  Glass Art > Alex Petrakis's Gallery - Glass Artists.org  with Alex Petrakis glassblowing Reverse Axis    2006-07-22

This general site also has a number of other technique pages, including Graal. Jon Baskett, computer aided design and decal manufacture

Technical Database

Afro Celotto  firthm/celotto.htm  2005-02-16

Reticello & other Venetian  There is, on this site East Falls Glassworks - Glassblowing Demonstrations an extraordinarily good set of pictures of making a goblet using the reticello technique that results in white cris-crossing lines in the glass.  There is no narration so some knowledge of what is going on, but every photo will click to enlarge to give a clearer view. The small images at the top bring out 3 other demos with as many photos that also enlarge to show making a goblet, a snifter, and a pitcher. 2006-08-31

This demo at Philabaum's Glass web site Philabaum Glass (click on Glass Studio link at top, then on Making a Scavo Bowl) shows a nice neat way of presenting a collection of images of a demo. 2006-09-30

Woven Glass - There are two tricks to making the appearance of woven (such as plaid) glass, one of which can be done as warm or hot glass while the other is purely warm glass.   The first is to make a thread pattern murrini by stacking and fusing thin layers of various colors.  This makes one square of the weave.  These sliced murrini are then laid down alternately so the threads go one way then crossways to that, laying out the plaid or the weave.  This is then fused in the kiln, heated on a pastorelli, or otherwise heated and picked up or done as a roll-up.  The alternative is to lay out on a kiln shelf bars of kiln shelf material as wide as a band of thread which are separated by the same width.  Each bar should be twice the height (or a bit more) of the thickness of the glass.  In step one, lengths of glass either plain or previously fuse ribbon patterns or stringer threads.  These are taken up to sagging temperature so the section between the bars sags to the kiln shelf.  After cooling, the bars are removed and the strips shifted so the rise in one is next to the drop in the next.  Additional flat strips of glass are slid in the pattern, over the drop and under the rise.  The whole is then reheated to fuse and flatten the pattern as desired with more or less texture to "fabric" 2007-06-08

Various Techniques: Rollup cane, drain glass, stacking color, off beat mold, heavy glass.
Making: A large abstract shape using a team. Artist: Marvin Lipofsky Where: Tacoma Museum of Glass
Special Equipment: Odd "optic" mold, heavy lifting, softening cane in kiln.  Shows very clear view of preheating and heating of cane on pastorale, how it is held in place and rolled up. Also shows handling heavy glass and draining to get smooth even coating of added glass. https://www.youtube.com/watch?v=fJIR8q8vTec&feature=related (opens in new window) 2009-01-26


Contact Mike Firth

Making:
Artist:
Where:
Special Equipment: