|
Intro
Well, my log mold idea (set out below) has become a serious ongoing project,
involving solution of the problems of making the molding of the log surface and
the step portion on the back (fitting it in the space with enough shelf to hold
a votive candle) and building the 3 piece mold holder. So it gets its own page.
2003-08-04
Three Piece Mold Blown glass (Three mold from
McKearin) is a classic way of producing glass,
requiring a mold in three pieces (amazing) that opens either sideways (2 sides hinging
off the middle section) or from the top like a blossom - which takes a special rig. I have
started building such a special rig, using 3 V-shaped steel forms to hold
aluminum (or wood) inserts. The V's are mounted on pivots with a ring
raised by foot pressure to open and close the mold. Besides the log mold,
I am making wooden masters to blow a three sided bottle with an insert to
"advertise" the people who buy the bottle. [And I got distracted in
making clay split molds for the same purpose.
2010-10-23]
|
|
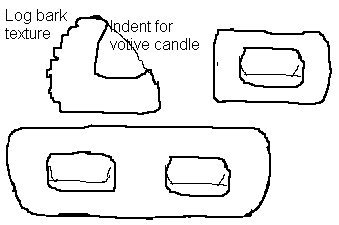 I
have an idea for blowing a votive candle holder that will look like a log and
have recesses to hold votive candles so the light of the candles comes through
the glass. The idea of logs with candles is copied from ceramic logs to be
put in fireplaces with candles in them. The glass is, I think, unique.
The sketch, right, made midway in the thinking, shows the basic idea. While
drawing, remembering I was working blown glass, it occurred to me that a hole at
one end, besides being necessary, would allow liquid into the bottle shape.
And while writing this, it occurs to me that candle oil, colored or not, could
be put in, without votive candles, but with wicks in the indentations. But
I would still need those to bring the flame behind the texture. And with
candle oil the liquid could not be above the flame! 2003-04-03 I
have an idea for blowing a votive candle holder that will look like a log and
have recesses to hold votive candles so the light of the candles comes through
the glass. The idea of logs with candles is copied from ceramic logs to be
put in fireplaces with candles in them. The glass is, I think, unique.
The sketch, right, made midway in the thinking, shows the basic idea. While
drawing, remembering I was working blown glass, it occurred to me that a hole at
one end, besides being necessary, would allow liquid into the bottle shape.
And while writing this, it occurs to me that candle oil, colored or not, could
be put in, without votive candles, but with wicks in the indentations. But
I would still need those to bring the flame behind the texture. And with
candle oil the liquid could not be above the flame! 2003-04-03
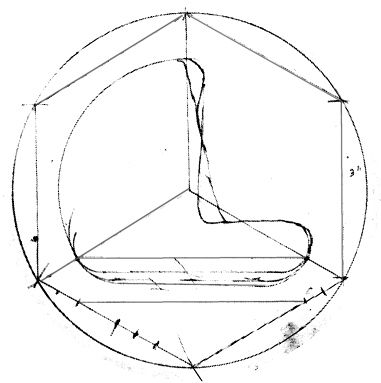 At
the right is a working drawing to scale of the end of the 3 piece mold to work
on the planning. Several smaller drawings were used during planning.
This drawing shows the 3 problems facing me. The inside of the mold
holding unit is 3" on each of the six sides, welded in pairs, so the three parts
open out. Each of the three sections poses unique problems to solve if
they are to come together. At
the right is a working drawing to scale of the end of the 3 piece mold to work
on the planning. Several smaller drawings were used during planning.
This drawing shows the 3 problems facing me. The inside of the mold
holding unit is 3" on each of the six sides, welded in pairs, so the three parts
open out. Each of the three sections poses unique problems to solve if
they are to come together.
The bottom is geometric - is is the same as one of three sides that will fit together
to make a bottle mold - the curve drops halfway through a 3/4" board and emerges at a
60° angle to meet the next. It has been cut with a router bit.
The left section is the molding of the log face (below) which means it
conforms only nominally to the curve drawn, but must meet the other two an
exactly as possible to avoid seams.
The right section is a shelf to hold a pair of votive candles side by
side. It must be deep enough (left to right in the drawing) to hold
the candles, shaped to permit a standard tapered votive candle cup and still
release when blown. It must match to the log face at the top and to the
precise base on the right joint.
[In the original, the outer circle and 6x hash markers were drawn with a compass
as were the curves of the bottom's ends.. The 6 outer straight lines and
ones to center were drawn with a straight edge, as were the added lines of the
bottom and the left log curve. The rest were free hand drawn. After the drawing was
scanned, because some parts of it were very light, a graphics draw tool was used
to strengthen the 9 straight lines of the hex and the three lines of the bottom.
2003-08-19]
|
|
Log Mold
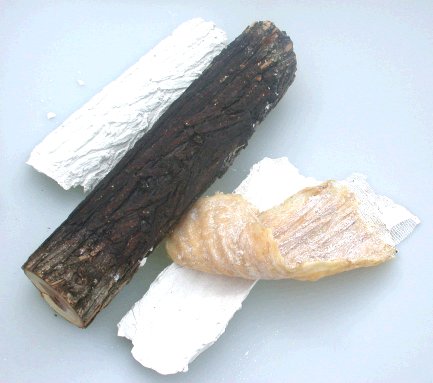 In
the middle of the picture is the chunk of log, selected for size and a nice
looking tight bark. It was given 4-5 coats of shellac to seal the pores. Common
latex mold compound was painted on repeatedly, about 10 coats, drying to amber
between each coat. Finally medical gauze was laid on top and a couple of more
coats added. Before removing the latex from the log, a layer of plaster of Paris
was laid on, then another layer when the first was set, gauze was soaked in
plaster and added and more was painted on top. When all the plaster was "dry"
and no longer cool to the touch (about 3 days), the plaster and the latex were
worked off together, peeling the latex all around from the edges, the reinforced
plaster coming free early in the process. In
the middle of the picture is the chunk of log, selected for size and a nice
looking tight bark. It was given 4-5 coats of shellac to seal the pores. Common
latex mold compound was painted on repeatedly, about 10 coats, drying to amber
between each coat. Finally medical gauze was laid on top and a couple of more
coats added. Before removing the latex from the log, a layer of plaster of Paris
was laid on, then another layer when the first was set, gauze was soaked in
plaster and added and more was painted on top. When all the plaster was "dry"
and no longer cool to the touch (about 3 days), the plaster and the latex were
worked off together, peeling the latex all around from the edges, the reinforced
plaster coming free early in the process.
The latex mold was further dried, then laid back into its plaster backup and
liquid plaster mix was spooned in place and left until it set and dried.
In the picture are the resulting plaster positive (left), the mold folded back
on itself on top of the reinforced plaster backup (right). The positive is not
reinforced as I expect to have to break it out of blow mold.
Next step is to make 2-3 more sides: a flat bottom, a curved back, combined with
or separate from a top with recesses for holding votive candles, so the light
will shine through the log textured front. These pieces will be assembled
(perhaps) or otherwise used to make a 3 or 4 part blow mold from refractory or
other material housed in a metal shell built to fit a machine to flip it open
when blown into. From looking at the sketch, 3 part seems more likely than
when I started typing. 2003-04-03
|
|
Well, I tried making a plaster negative off the plaster positive and killed
the positive - too many undercuts and not nearly enough separator. So I
have cast another positive from the rubber mold and am going to do two things:
try to make a rubber positive from the rubber negative and form thin aluminum
foil on the plaster positive to omit undercuts in a detailed way. 2003-04-25
And while the plaster positive is good, and the aluminum foil worked to make a
less defined negative, the rubber positive from the rubber negative turned into
a disaster. I coated the negative with several coats of English soap, but
apparently missed enough that getting all of the positive off turned into a
muscle twitching wrestling match that ended with some damage to the negative and
a lot of damage to the positive. Where the soap worked, it worked well.
I think I will add food coloring to the soap if I do it again to insure even
coverage. Maybe I should just pour out enough soap to bathe the surface of
the mold. 2003-05-06.
Finally thought my way through and got a good wax positive,
which I can use for a sand casting or a lost wax. To get a rubber negative
with less detail to get caught in plaster or wax, I took a stiff brush and
worked Crisco white fat down into the log's grooves, filling in the bottom.
I then took a cloth and wiped across the surface, removing fat in the details
nearer the surface. I then built up yet another latex mold backed with
gauze. This one came off reasonably good looking. Also, since I know
more about what I find interesting, I positioned it to pickup two branch lumps a
bit further over than I had before. Today, I melted molding wax and let it
cool down well below 190F so that it would be less liquid and less damaging to
the latex and poured several layers, shaping the outline as I went, to get a wax
positive. Now I will have to shape the rest. 2003-08-03
I now have an investment positive of the log to use as a base to shape
wax for the full shape. 2003-08-18
|
|
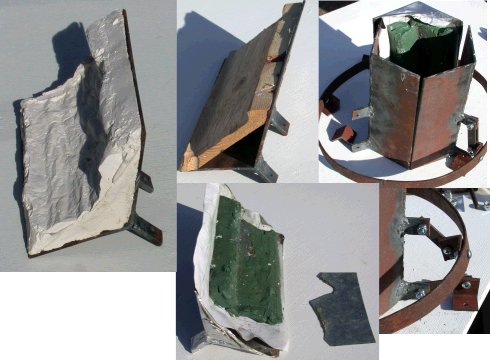 After
a year and a half, I have gotten back, somewhat, to the 3 piece mold assembly,
at least to take pictures. After
a year and a half, I have gotten back, somewhat, to the 3 piece mold assembly,
at least to take pictures.
At the right are three sections welded up to make a hexagon with tabs for pivot
points, assembled in the far corner. The plan is/was that the ring would
pull on the three pivots together, being lifted by a foot pedal attached to the
ring at two points. Shown are three of the inserts being worked on.
The near one in plaster is the back of the log mold in coarse form. The
green clay is the shelf side of the log mold, scraped to shape with the metal
shaper laying beside it. And the wood is a dummy for casting inserts for the
bottles and the third side (bottom) of the log mold. 2005-02-09
|
|
Bottle Mold
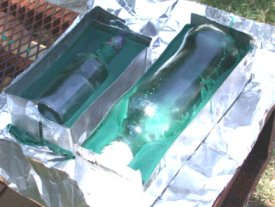 I have looked at bottles for some time and wondered about
blowing the more interesting shapes, while also working on
neck molds for any shape I might make. So I
bent up some thin metal trays from aluminum flashing, too thin for much else,
and taped the joints with metal repair tape, greased the bottles, and melted the
wax. To keep the bottom of the mold reasonably thick, I took 1/8" wax strips,
stacked them and balanced the bottles on them. The necks were roughly
stuffed with clay to the shape of the mold. A step I missed was to make
sure the seam from the original molding of the bottle was level to be a guild
line for pouring the wax. So I added more wax, after adjusting the bottle
position and box. I have looked at bottles for some time and wondered about
blowing the more interesting shapes, while also working on
neck molds for any shape I might make. So I
bent up some thin metal trays from aluminum flashing, too thin for much else,
and taped the joints with metal repair tape, greased the bottles, and melted the
wax. To keep the bottom of the mold reasonably thick, I took 1/8" wax strips,
stacked them and balanced the bottles on them. The necks were roughly
stuffed with clay to the shape of the mold. A step I missed was to make
sure the seam from the original molding of the bottle was level to be a guild
line for pouring the wax. So I added more wax, after adjusting the bottle
position and box.
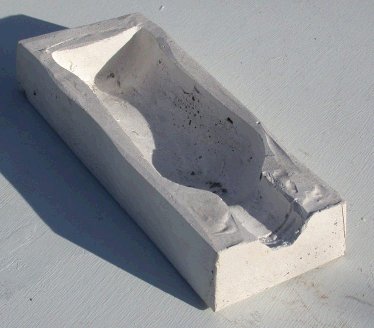
To date, I have tried sand casting two aluminum using the wax
(refrigerated for stiffness) as a model for the cast. So far I have gotten poor
results - too hot and damp mold so bubbling steam under the metal too little
metal for a clean pour. Making a new taller crucible for more metal. 2003-08-18
 As I have worked with trying to sand cast, I have been gradually pounding the
sand more, being more careful about vent holes and spruing and being sure I have
enough metal. I also added a lot more oil to the sand Although I
have not used it yet, I made a plaster mold of the bigger bottle in a different
aluminum shell with distinctly sloping sides. 2004-06-27 As I have worked with trying to sand cast, I have been gradually pounding the
sand more, being more careful about vent holes and spruing and being sure I have
enough metal. I also added a lot more oil to the sand Although I
have not used it yet, I made a plaster mold of the bigger bottle in a different
aluminum shell with distinctly sloping sides. 2004-06-27
|