|
|
Intro - We are not talking about rocket science when we talk about welding frames for furnace glassblowing equipment. The steel most likely to be chosen, low carbon steel tubing and angle, is the easiest to weld. The joints usually are the easiest to weld, simple butt and right angle welds. And most of the time all of the steel is the same thickness, usually 16 gauge, so the problems of welding thin to thick barely arise with the exception of one kind of joint. My experience is that welding can be learned on one's own with one of the books created for the purpose. I have seen a number of classes offered by art centers and community college continuing education that teach the basics of welding in 6-16 hours. I suppose it is worth warning that welding as a craft requires real skill and training. Different steels require different rods and techniques and even different equipment. Stainless steel, thin sheet, and overhead work all are tricky. A glass artist involved in using metal in her works may need to learn these skills to produce big, pretty, strong, accurate structures. I consider three kinds of welding to exist for glassworkers: Torch, Arc, and Wire-feed. Most people will consider wire-feed to be arc welding, but it is different enough in many ways that I hope you will accept my categories for the extent of this page. According to various sources, torch is the most difficult to learn, arc (or stick) the middle ground and wire-feed the easiest because it involves the least distance control. Welding is also possible using a forge and blacksmith techniques but that is a whole nother skill. TORCH WELDING - involves oxygen and acetylene gases being fed to a torch that produces a tiny very hot flame. I prefer welding with a torch. It is quieter and requires a lower level of safety equipment and smaller working area, and the equipment is more flexible, allowing brazing, cutting, and bending in addition to welding. It is also more costly. Requirements are tanks of oxygen and acetylene, which can be rented, regulators, hoses, torch handle, various tips, gloves, and eye protection. I use the same protection as I do at the furnace when glass working. A typical rig, sold with small tanks, will cost about $225-250. The swap cost (refill) of the small tanks is within a few dollars of medium sized tanks that last 5-10 times as long. Medium tanks cost $300 the pair to buy. In most cases, buying a standard size tank allows immediate swap for refilling rather than actually leaving the thing to be refilled. ARC WELDING - involves a transformer producing a low voltage, high amperage current that is fed through heavy cables to a clamp on the work piece and a handle with a rod which is consumed as a very bright arc jumping from rod to piece heats the metal molten. Arc welding equipment can be quite compact and plug into household outlets. A rig can cost under $150 new and a recent online discussion suggested paying more than $50 for a 120 volt unit used is a rip-off. Higher capacity and more flexible equipment will cost considerably more and require 240 volt power. Arc welding throws a lot of sparks, requiring a fireproof area to work and protective clothing, and produces a very bright, UV rich, light spot that requires a higher (#10) shade of eye protection. Although it is possible, it is not easy to cut with an arc welding unit. Spot welding clamps sheet metal between two heavier rods and heats just the spot where the current flows. WIRE-FEED WELDING - has a tank of gas, a
coil of wire, and a handle that feeds both to the welding site. While arc welding is normally
done with flux coated rods 1/16th - 1/8th inch in diameter, wire
feed welding is done (obviously) with a wire, which is much smaller in
diameter and automatically fed from a reel. More importantly, it is done with
inert gas flowing around the weld spot. (With the exception of flux cored wire.)
The two most common products are MIG (metal inert gas) and TIG (tungsten inert gas) and the gas is
usually argon although carbon dioxide, nitrogen and other gases
are used. Using multiple kinds of gas requires buying or renting a tank for
each. With the right choices of wire, and gas, materials can
be welded that never could be welded easily before, including
aluminum, stainless steel, and chrome molybdenum steel (race car
tubing.) This is the kind of welding I know the least. I have
encountered glass/metal artists who do MIG welding with a small
rig they own and tell me that the process is easy and reliable. More info
How to Select a Compact Wire Feed Welder | Lincoln Electric |
|
TOOLS AND EQUIPMENT - Beyond the welding rig, there are a number of useful and/or necessary tools for welding.
|
|
FIRST PROJECT It is shown here because I think it represents the style much of the welding glass workers do:
[The purpose of this unit is to allow moving both tanks with a
hand truck, so the unit is wide enough to take the tanks side by
side which makes it wide enough for the hand truck blade to fit
underneath between the square tubes put there for the purpose.
The base is made of angle to form a lip for the bottom of the
tanks. The side pieces at the top, with the hook, take a rope
tied to hold the tanks in. In the corners between the tanks and
frame, I put PVC tubes that hold brass brazing and steel welding
rod, and I set the cylinder covers on top of them. I usually
leave the regulators on and wrap the hose around the top.] As one reader
points out, it would be a better idea for the tanks to be more secure and run
this up higher to guard the valves of the tanks when the covers are off, there
is a lot of pressure behind the oxygen in particular. I tend to be careful
in handling. |
|
PREPARING TO WELD For the best possible results, the ends and edges to be welded should be filed, wire brushed or ground to clean them. This is even more true with brazing, where all the surfaces to contact the brazing metal should be clean and fitted as closely as possible to each other. Welding and brazing heat the metal, thus causing it to expand, and an
allowance must be made for the expansion, which may cause misalignment of
pieces, opening of joints, etc. Allowance may be tack welding, clamping,
preheating, etc. This is discussed in detail in welding text books. |
|
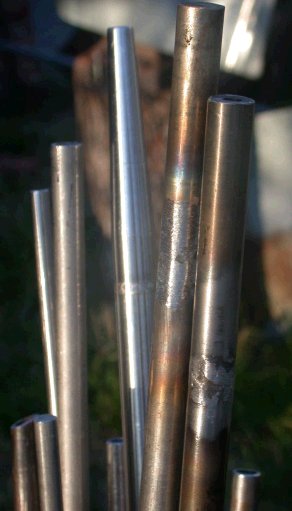
Plain Ordinary Steel "Steel" is iron with a moderate amount of carbon and often several other metal alloys. It is a material that comes in myriad forms and alloys, many of which have special properties and are a bear to weld either because of the properties or because the heat of welding destroys the properties. As glassblowers building equipment, virtually all the stuff being used is called low carbon steel although some tool steel with higher carbon may be used. Low carbon means 0.05 to 0.29%. Tool steels may have 1-1.2% and small amounts of Mn, Si, and Cr. (more detail) Low carbon steel, or plain ordinary steel, is which can be bought at hardware stores and home centers in 3, 4 and 6' lengths and more economically from steel distributors in 20 and 24' lengths (most will cut it to carry home lengths, tho you must take the whole piece except at a few places like Metals Supermarket.) It is a dull grey with a dirty oily surface and will rust easily. If a file or hard tool is drawn across it, it will show a silvery scratch and feel soft. It can be easily cut with a hacksaw or metal cutting blade in a recip saw or jig saw. It can be easily drilled compared to hard steel. Long thin pieces are easy to bend. (One odd example of thin hard steel that is very hard to drill is bed frame rails, which show up in used steel lots - look nice, thin angle, awful to drill.) Steel is sold in sheets where the thickness is measured by gauge and in long shapes which are described from the section or end view where the thickness is also measured by gauge but differing slightly from the flat sheet thickness. The names and the end view are Bar - solid metal in rectangular, square or round, Angle - an L shape with equal or unequal arms, Tubing - a round section, Square Tubing - 4 equal sides, and Rectangular Tubing - 2 pairs of equal sides. Rarer forms include U Channel, Oval, C, I, H, and Triangular sections. Glassblowers will most often be building from Angle and Square Tubing. Most of my equipment is 16 gauge which is an easy to remember about 1/16". Heavier stuff may use angle referred to as 2x2x1/4 which means the outside dimension of each flat leg is 2" and the nominal thickness is 1/4". |
|
STAINLESS STEEL WELDING |
|
|
|
From: "Clarke Echols" To: <mikefirth> Subject: Your web page on welding for glassblowers Date: Tuesday, July 15, 2003 11:36 PM Mike, I have been in and out of your site several times, sometimes from links in Usenet News, and I commend your generosity in providing so much valuable information to those wanting to learn more about the subjects you cover. I have been welding since high school in 1958 or so, not professionally for hire, but enough that I have substantial competence with TIG, stick (arc) welding and oxy-acetylene. I have not yet tried MIG, but my son promises that once I try it I won't want to ever stick weld again. We'll see... Anyhow, I wanted to point out some minor nits on your welding for glassblowers page that will improve your image as a knowledgeable master of the trades. Not as criticism, but more as an editor (I was a professional technical writer and learning-products design engineer at Hewlett-Packard for 20 years after spending most of the first decade there as an electrical and mechanical engineer (my degree is in physics with graduate studies in engineering). You use the term "braising", which means to cook in fat with little moisture in a closed pot. The word you want to use is "braze" and "brazing", which means to solder with a non-ferrous alloy that melts at a lower temperature than the metals being joined according to Mirriam-Webster. I would amend that to exclude tin-lead solders, and limit it to (usually) brass or silver alloys. TIG and MIG refer to "tungsten-inert gas" and "metal-inert gas" welding where the T or M refers to the consumable electrode: Tungsten electrodes are operated with a polarity that does not cause the electrode to be transferred to the pieces being welded, and its behavior is quite similar in many respects to oxy-acetylene welding (in terms of torch techniques); MIG welding replaces the "stick" welding rod used with conventional arc welders (which use constant-current power supplies) with a continuous spooled wire that carries the electrical current and melts and deposits the wire into the welded joint (MIG welders use constant voltage between the work and the torch/electrode instead of constant current through the electrode as in normal arc welders). The wire is usually composed of a material very similar to the metal being joined. Both use an envelope of inert gas (usually argon, carbon dioxide, or a blend of the two gases) to prevent atmospheric oxygen from being able to react with the molten metals until they cool sufficiently to ensure that no weld contamination and oxidation occurs while the parent and weld metals are melted. The biggest advantages of MIG and TIG welding relate to no need for coatings on the wire or stick electrode. Consequently, there is no need for cleaning welding slag from the work when finished. They also allow very short, brief welds which can be done in succession to greatly reduce heat distortion in the base metal being welded. You mention that if arc welding, don't use water. I would tend to disagree as long as the welder itself is not going to get wet. Electrode voltages are typically 80 volts open-circuit (not in operation) and about 25 volts when actually welding ("stick" arc welders). This is hardly going to be as risky as if you have 240 or 120 volts around. Which brings up another nit: Many people talk about "220 volts" or "110". Those voltages were standard around World War II in the first half of the last century. By the late 1950s, it was 115, then 117 volts (or 230), and now the correct usage is 120 and 240 volts. My electrical supplier delivers 123 volts to my home and 246 volts to my welders and big power tools. So to be completely correct, I recommend 120 and 240 volts as "standard usage". ANY high-pressure bottle such as CO2 and oxygen bottles for welders that come with 2000 psi pressure on delivery MUST be secured! My high-school shop teacher told us of a time when his industrial arts professor at what is now Colorado State University took his class out on a vacant stretch of straight railroad track, laid a 225 cubic-foot oxygen bottle between the rails, removed the safety cover, and broke the valve off with a hammer. They found the bottle 5 MILES down the track! That was enough to convince me. Also, before you open the valve on a high-pressure bottle, be sure the pressure regulator screw is completely loose (zero pressure output) before you open the valve, then open it carefully and slowly. Also, before connecting the regulator to an oxygen bottle, crack the valve and blow any dust and dirt out of the opening. A piece of sawdust or any other organic matter can immediately burst into flame and explode if subjected to pure oxygen at high pressure. It isn't always necessary to completely clean all the oxide off of iron or steel before brazing. The flux will clean off any normal surface oxide. Heavy flaky rust must be removed, however. The trouble with stainless steel when welding is that it is a poor conductor of heat and has a very high COE (coefficient of expansion). When you heat it to a plastic state, it expands and the plasticity allows it to stress relieve to zero stress while hot. When it cools, it freezes, then continues to cool, going into tension where heated. This pulls on the surrounding metal and cause much more pronounced heat distortion than you normally encounter with mild steels. For this reason, stainless can be very tricky to weld unless you know its behavior very well and know how to make it go the way you want it to when it does distort. You have a lot of really good stuff on your site. I'm just tossing this over the fence as a token of appreciation, hoping it will help make your content even better. Keep up the good work. Best regards, Clarke Echols Loveland, CO |
 The drawing to the right of
an oxy-acetylene cylinder holding rack is the first torch welding
project that I carried out after I got my torch welding set (I am
sure I practiced a bit before this and may have done something
with the small tanks that came with the set, because I recall
refilling them. And I had done arc welding when I learned in
theater graduate school.)
The drawing to the right of
an oxy-acetylene cylinder holding rack is the first torch welding
project that I carried out after I got my torch welding set (I am
sure I practiced a bit before this and may have done something
with the small tanks that came with the set, because I recall
refilling them. And I had done arc welding when I learned in
theater graduate school.)