Hot Glass Bits #41 Notes
Contact Mike Firth
June 1, 1999 - Dec 31,1999 Rev. 2003-02-14
THE INDEPENDENT
GLASSBLOWER [% David Gruenig, RFD #2 Box 238-B, Lyndonville VT
05851, davygee1@together.net, $25/yr qtrly] has sent #51
GLASS #72 [GLASS Magazine, UrbanGlass,
647 Fulton St., Brooklyn NY 11217-1112, 1-718-625-3685, $28/yr, $52/2yr,
qrtrly]
HORIZONS [The New England Craft Program,
108-P N. Main Street, Sunderland MA 01375, 413-665-0300, FAX: 412-665-4141,
e-mail: horizons@horizons-art.org] announces
---------------
CREATIVE GLASS CENTER - A
notice from the Wheaton NJ Creative Glass Center of America tells
of a 9/15/1999 deadline for year 2000 fellowships. These
fellowships allow unlimited access to a substantial hot glass
shop with technical support for 3 months (1/10-4/7; 4/24-7/21; 9/11-12/8)
with room, board, and a stipend. The only obligations are to work
in public view (not on demo pieces, which are done by techs) for
12 hours a week and provide one work made during the fellowship
to the CGCA Collection. A bunch of stuff is needed - slides,
multiple copies of resume etc. - so get detail and application
early: 609-825-6800 x2733; fax 609-825-2410 Creative Glass Center
of America, 1501 Glasstown Road, Millville NJ 08332-1566. (Millville
is the center of early glass making in the U.S. (until all the
trees were burned) and the modern studio is located in a
representation of an early glassblowing factory. It is west of
Atlantic City in south central New Jersey.)
DIGITRY writes to remind us that they
have been at their new address for a year [Digitry Company, Inc.,
188 State Street, Suite 21, Portland ME 04101, 207-774-0300, FAX:
617-484-5220, http://www.digitry.com, info@digitry.com] and the
post office is about to stop forwarding. Ron Shapiro also
mentions several products of interest: The GB1 is now available
with 4-20 Milliamp output as well as Pulse-Width Modulation and
Time-Proportioning Control. A graphic output will send data to a
PC for graphing and the information can be stored for input. A GB4
PowerLimiter will time apportion power between two to five units.
Each unit gets up to two minutes of power, less if it is
progressing nicely, so units can be used totaling more wattage
than the capacity of the supply. 7/11/99
CASTING - I have been teaching myself
casting, borrowing generously from books, web sites and suppliers.
My purpose is to be able to cast aluminum parts for tools to
manipulate glass and brass or bronze pieces into which I might
blow glass - goblet stems and feet, cages, etc. The aluminum I am
using is from melting soda pop cans, most of which I drink - far
too many as I see the accumulation. The brass, which hasn't been
used much so far is from some old brass letters and keys around
the Store.
My experiments this summer have been aimed at making a tool for
shaping the necks of bottles so standard caps will fit with the
additional goal of trying to put threads on for standard screw on
caps. I have already learned that the latter is not going to be
easy. In exploring for materials, I rather quickly settled in on
Swest, a national supplier to the jewelry industry that is
located here in Dallas. I gradually learned various things
through books and looking at the supplies offered. I learned most
of all that what I wanted to do was a rather awkward size, being
big for jewelry related stuff and small for foundry casting sort
of stuff.
Previously, I had made an expedition to Ft.Worth and from a
foundry supply company (all of them seeming to be over there)
gotten a bag of premixed foundry sand (it has a chemical that
forms a binding agent with the very fine sand when an astonishly
small amount of motor oil is added.) It is interesting stuff that
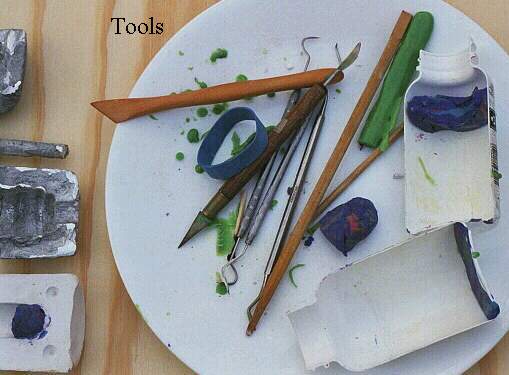
I have not worked with very much. From Swest (and with their
advice) I bought a box of investment, a modest supply of green
casting wax, an alcohol lamp, and several tools. Investment looks
like plaster, is much less complicated to mix and stands the heat
of molten metal. It is not waterproof and in fact is removed from
the molds and molded material by soaking in water. Investment is
not strong enough to stand alone (I learned in one failure) when
molten metal is added and must be contained inside a sleeve.
Swest sells stainless steel sleeves with rubber bases and I
bought one, but the sizes are limited and the prices go up
rapidly. I happened across a length of 3" (nominal) thin
wall conduit at the used metal yard and bought it for several
purposes one of which is making these sleeves. I am thinking of
getting some 4" conduit.
[CUTTING large tubing so it has square
ends: Wrap a piece of typing paper around the tubing until the
ends (nearly) meet, line up the edge, tape it in place. Use a
marking pen around the edge. Cut the tube with a saber saw or
reciprocating saw.]
When using a proper SS sleeve, a rubber end cup both seals it and
supplies a pattern for pouring the metal because the wax is built
on the ring of the cup. I build my pieces to sit with flow tubes
(vents and risers) pointed up and put a layer of thick investment
in first after wrapping the bottom opening of the sleeve with
alumium foil and sitting it on a plate. Then somewhat thinner
investment is poured around the wax model as I support it in
place. Before pouring the metal, I carve out a funnel shape at
the end of the risers, usually just before the final heating
after wax melt out.
These mentions of wax make it obvious that I am using the lost
wax method of casting. Getting the wax model that is to be lost
is a multistep process which I will go though without trying to
cover everything in the books on casting. The overwhelming
advantage of lost wax is that all the considerations pattern
casting - drafting the edges to remove the pattern, designing the
pattern to avoid or relieve undercuts, getting the pattern out -
can be set aside (mostly.)
Make a pattern of the piece in wax, pour investment around it,
and go (well almost, see below.) These are the steps, with added
comments, in making the molds for the bottle neck former I am
fooling with now. The design (evolved while working on the wax
models, I will admit) is a three part unit to be mounted on a 1/2"
tubular shaft: a center post to form the inside of the bottle
opening and support the neck as two blocks shaped to fit the neck
ridges are closed with a plier action to form the glass. The
blocks have enough aluminum to carry the heat (I hope [yup, when
tested]) of the glass, which is way above the melting point of
aluminum. The center post is now two cylinders in line, a larger
short inside the neck and a rod of smaller diameter but longer.
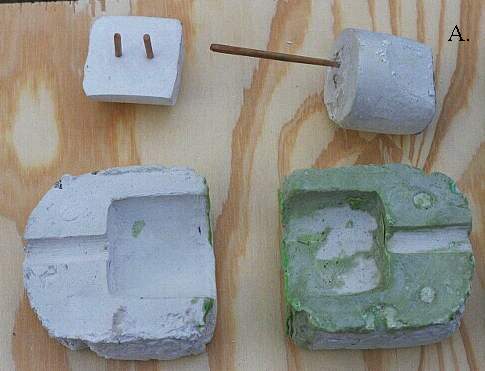
| The original model was made by taking plasticine clay (children's
modeling clay), forming a roughly shaped rod and fitting it in
the bottle being used as a model. This soft clay model was then
used to make a plaster mold in the halves of a small plastic
bottle using standard clay mold techniques. (i.e. support the
model so the plaster will come to the centerline of the model,
pour plaster and set; treat the surface with English soap as a release, add the other half mold, cover the rest
of the model, set and unmold.) |
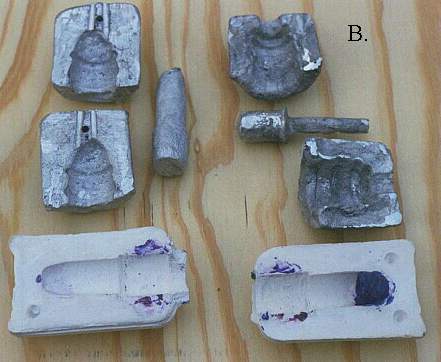 |
| After the model was made and used to make one aluminum
casting, it became obvious that the core was too thick and too
long. The original plaster was used to make additional wax models
by adding plastic clay to reduce the diameter and length where
needed. The final form is a rod 3/8" diameter about 2"
long attached to a cylinder about 3/4" in diameter by 1"
long which is rounded opposite the rod to more easily fit in the
bottle neck and has a lip opposite (around the rod) to form the
inside of the lip.) (PIC B) The two halves of the body of the
former started by taking the same plastic bottle halves used
above and making a plaster cylinder 2" in diameter and 2"
long. Originally the plan was to use this to make the pattern of
the outside of the shell which would be filled with hot wax into
which would be pushed a prepared investment core |
 |
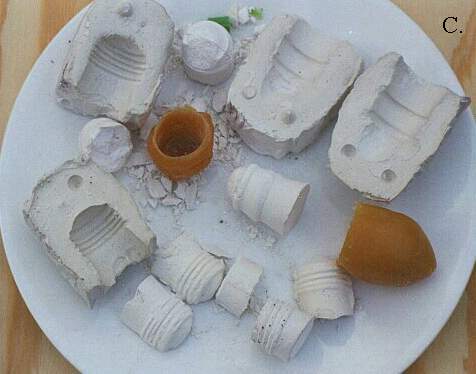
Latex rubber molding compound was used to make
molds of several bottle necks and several cores were poured. (PIC C) When the first attempt was made to carry out
this idea, problems that would be obvious to anyone with
experience with plaster molding and which are mentioned in the
books became obvious to me: There was no way to accurately align
the core, so making a good cut for a split was impossible, so the
fit on the glass would be uneven. Further, getting the cylinder
out of the unsplit plaster mold was very difficult.
Never the less, the whole process was carried through once, just
for practice (and hope it might work.) A wax impression of the
cylinder was made with an investment core pushed in place with
enough hanging out to lock the core into the surrounding
investment. The wax was used to make a lost wax mold (see more
below), the wax was melted out, and a casting was attempted. |
 |
 For a first try, the results were okay as castings.
However, the core broke free on one and was badly misaligned on
the other and attempts to saw the cylinders cleanly in halves
were absurd. Having the cast cylinders in hand made it clear that
it would be hard to make a unit that could be handled easily, so
the mold was used to make a new plaster cylinder model that was
tapered to allow easier and closer attachment of the spring
supports. This model was further carved to shape and was used to
make a more traditional split mold. A small cardboard box was
taped up and lined with thin aluminum foil. The model was treated
with separator and plaster was added to the box and the model
pushed into the top. When set, the box was built up, the surfaces
treated with release and the top of the mold poured. This gave a
basic working mold. (PIC)
For a first try, the results were okay as castings.
However, the core broke free on one and was badly misaligned on
the other and attempts to saw the cylinders cleanly in halves
were absurd. Having the cast cylinders in hand made it clear that
it would be hard to make a unit that could be handled easily, so
the mold was used to make a new plaster cylinder model that was
tapered to allow easier and closer attachment of the spring
supports. This model was further carved to shape and was used to
make a more traditional split mold. A small cardboard box was
taped up and lined with thin aluminum foil. The model was treated
with separator and plaster was added to the box and the model
pushed into the top. When set, the box was built up, the surfaces
treated with release and the top of the mold poured. This gave a
basic working mold. (PIC)
A CLASS AT THE STUDIO AT CORNING - For the
week of Labor Day, I traveled to Corning NY, for class in mold
glassblowing with Walter Evans, who makes wooden blocks and molds
for over 1000 studios. This is a report on that class with
discussions of the place, the methods, and the particular class.
Corning is a modest sized town (14,000) in a river valley below
tall overhanging plateaus that are ideal for soaring and the
shared airport with Elmira is a center for soaring and making the
gliders. Corning's downtown is a very nicely preserved older
buildings with a lot of restaurants, glass studios, arts and
knickknack galleries, an Eckerds, and sales outlets for Corning
and Revere housewares. In other words, it is tasteful touristy.
The edge of town along the river is dominated by the long black
glass building of the Corning headquarters
 and
across the river at the other end of a broad walking bridge is
the Corning Museum of Glass including the library and the Studio.
There are also a number of buildings used for research. The
arrangement at the Studio is that students are housed double
rooms in a Days Inn just down the river with meal tickets issued
for breakfast at two places and dinner at four or five. One of
the breakfast places is a bakery with light cooked breakfasts and
the other is an employee food place with rather heavier meals.
The dinner places range from the Glory Hole Pub with fairly good
bar food (burritos, chicken breast) to Medleys, a pure vegetarian
restaurant, to a Chinese restaurant, to Rouseau's a very nice
classic cooking place just around the corner from the Inn. Lunch
is brought in each day, something different each day with
vegetarian included each time, ranging from pizza to Medley's
food to sushi/teriaki to cold cuts with rolls and bread with
salad. Days Inn is a nice ordinary motel with a pool I used
almost every day.
and
across the river at the other end of a broad walking bridge is
the Corning Museum of Glass including the library and the Studio.
There are also a number of buildings used for research. The
arrangement at the Studio is that students are housed double
rooms in a Days Inn just down the river with meal tickets issued
for breakfast at two places and dinner at four or five. One of
the breakfast places is a bakery with light cooked breakfasts and
the other is an employee food place with rather heavier meals.
The dinner places range from the Glory Hole Pub with fairly good
bar food (burritos, chicken breast) to Medleys, a pure vegetarian
restaurant, to a Chinese restaurant, to Rouseau's a very nice
classic cooking place just around the corner from the Inn. Lunch
is brought in each day, something different each day with
vegetarian included each time, ranging from pizza to Medley's
food to sushi/teriaki to cold cuts with rolls and bread with
salad. Days Inn is a nice ordinary motel with a pool I used
almost every day.
[More pictures and commentary here
c-99glry.htm and here corning.htm ]
The Studio is three smaller classrooms for torch work,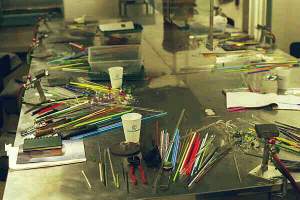 kiln/paint
work
kiln/paint
work 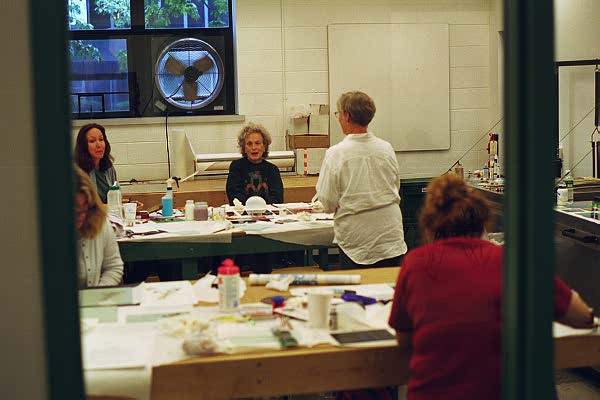 and wet
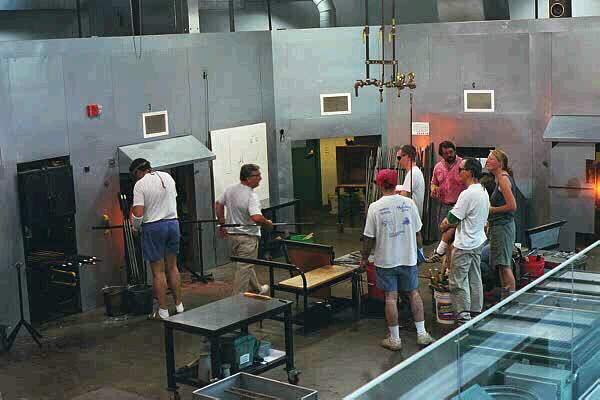 moldmaking, a
meeting/lunch/video room, cold working room, offices, and the hot glass studio
which occupies about half the space.
moldmaking, a
meeting/lunch/video room, cold working room, offices, and the hot glass studio
which occupies about half the space.
The whole arrangement has windows for public observation with bleachers in
the studio and references are
made in the museum to the chance to visit the Studio. (More on
the Museum below - Visits.) The classes offered the week I
attended were lampworked paperweights, reverse painting on glass,
and moldblown furnace glass. Both students and instructors were
encouraged to visit the other classes and try their hand. For a
weeklong class there are 12 three hour sessions, morning and
afternoon Monday thru Saturday with practice use available from 4
to11 (and less used than I expected, I was very tired.)
Representatives of the library and a curator at the museum came
in at lunch. During the evening slots were provided for a tour of
the museum, the Steuben blowing floor, a look at the study cases
in the museum, a visit to the museum photography space (PIC), along with slide
shows of instructors' work (very impressive) and student work (depressingly
impressive for me.) See visit notes and classmate notes below. Walter Evans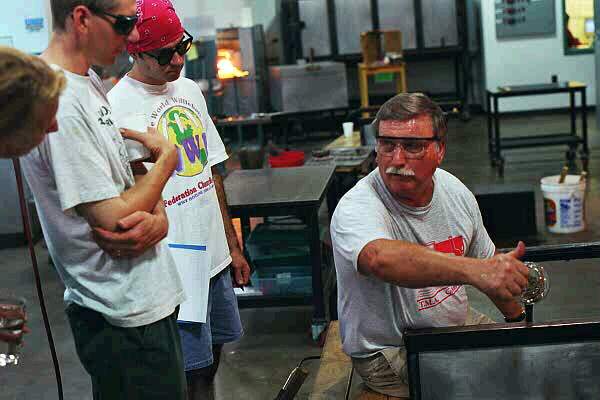 will be celebrating
his 65th birthday and his 50th year in the handblown glass
industry early next year. The first 31 years involved working his
way up through factory glassblowing from a bit boy to a gaffer at
Pilgrim Glass. He then spent 8 years as a foreman and then
switched full time to making molds, something he had started
after taking a woodworking course and being asked to take over
when the Pilgrim mold maker died. Walter has a lot of stories to
tell about mass production of glass by hand methods and is firm
in his opinion that art glass is destroying the glass factories
because the factories haven't moved with the time. Until he
discussed the number of people involved in making some products,
I guess I did not realize how much of a factory it is.
will be celebrating
his 65th birthday and his 50th year in the handblown glass
industry early next year. The first 31 years involved working his
way up through factory glassblowing from a bit boy to a gaffer at
Pilgrim Glass. He then spent 8 years as a foreman and then
switched full time to making molds, something he had started
after taking a woodworking course and being asked to take over
when the Pilgrim mold maker died. Walter has a lot of stories to
tell about mass production of glass by hand methods and is firm
in his opinion that art glass is destroying the glass factories
because the factories haven't moved with the time. Until he
discussed the number of people involved in making some products,
I guess I did not realize how much of a factory it is.
One small example: glass basket has a handle and the guy who
does the handles all day has two bit gatherers working with him
because it takes two people gathering to keep up with handle
placer, who does nothing but that. The class is built around the
kinds of molds that Walter makes: split molds that are symmetrical
around a vertical axis where the glass is placed as a hanging
blob after preshaping and the halves are closed while the glass
is rotated and inflated until it is shaped to the form of the
mold. Walter's molds are turned from cherry wood which is soaked
in water. Heavy use industry molds are made of iron or aluminum
which is finished on the inside with a sticky goop that holds
cork powder or similar material that is burned in place to
provide a carbonized surface for holding the water that makes the
steam surface the glass is blown against. Thus, we are not
talking about two piece bottle molds with pictures of log cabins
or George Washington (usually iron and hot) or three piece
contact molds ("three mold blown") used to make
pitchers, etc. in early 18th Century American blown glass. An
important difference between the iron molds and Walter's type is
that Walters much more obviously provide a starting point for
working the glass. Mold blown bottles were normally taken from
the mold, the neck worked briefly if at all, and the bottle
annealed.
Three mold blown examples include clear cases where the same
mold was used to create a pitcher, a vase and a bowl, but those
involve working the top of the glass and avoiding damaging the
detail of the mold below. Much of what comes out of a turned mold
could be done by hand on the pipe. It would take longer and not
be as uniform. By using the mold, a glass worker can get to a
specific starting point for further working the glass in, say, 8
minutes instead of 15 minutes, or 7 minutes instead of 20 when
the piece is more complicated in shape. Some effects from a mold
are simply much more difficult to keep in crisp shape by hand,
like blowing the basic shape into an optic before blowing into
the mold, to get the mold shape with optical ridges on it. The
glass going in can be colored or have other variations. Once the
piece has been molded, that may be only the beginning, with the
molded part ending as only the base of a bowl, or forming the
body of a vase, or making most of the shape of the piece with
added lip details and wraps. Our class began with basic shaping
of the glass to get the desired result. We used two basic molds:
a tumbler 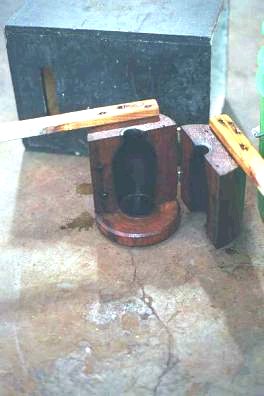
and a vase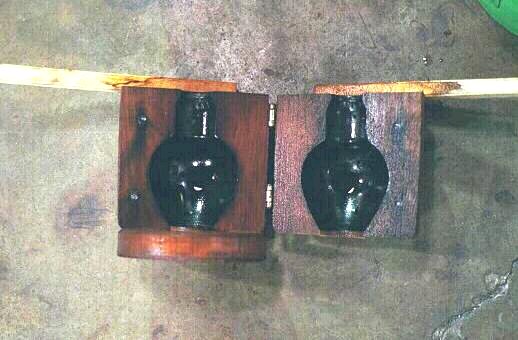 Each mold was turned from a single block of cherry
that was sawn down the center and hinged above a disk shaped base
that formed the bottom of the piece. The problem in both molds,
but particularly the straight sided tumbler mold, is that once
the glass hits the wall it stops moving up or down. A thick blob
of glass of too round a shape will result in the thickness
hitting the wall and then the bottom moving down getting thinner
and thinner because that glass at the wall is not being stretched.
The ideal pattern is a necked blob that is allowed to stretch to
the bottom of the mold without being inflated against the sides
and then it is inflated so the center touches the bottom and the
sides are blown out against the walls, actually (in a simple mold)
forming the shape from the bottom up. The glass has to be kept
rotating and the inflation matched to the glass forming inside
the mold as revealed by the hot glass glowing through the seam
and the locations of the steam coming out the vertical seams and
the vent holes, gently at first, then more firmly to press into
the corners. When the blower judges the glass ready, a tap of the
foot signals the person holding the mold and the blowing must
stop to prevent disforming the piece as the mold is opened.
Each mold was turned from a single block of cherry
that was sawn down the center and hinged above a disk shaped base
that formed the bottom of the piece. The problem in both molds,
but particularly the straight sided tumbler mold, is that once
the glass hits the wall it stops moving up or down. A thick blob
of glass of too round a shape will result in the thickness
hitting the wall and then the bottom moving down getting thinner
and thinner because that glass at the wall is not being stretched.
The ideal pattern is a necked blob that is allowed to stretch to
the bottom of the mold without being inflated against the sides
and then it is inflated so the center touches the bottom and the
sides are blown out against the walls, actually (in a simple mold)
forming the shape from the bottom up. The glass has to be kept
rotating and the inflation matched to the glass forming inside
the mold as revealed by the hot glass glowing through the seam
and the locations of the steam coming out the vertical seams and
the vent holes, gently at first, then more firmly to press into
the corners. When the blower judges the glass ready, a tap of the
foot signals the person holding the mold and the blowing must
stop to prevent disforming the piece as the mold is opened.
Among the flaws found in poorly done pieces are: a twisted
neck from too hot at the neck; thin bottom from wrong inflation
timing, twisted body marks from stopping rotation and starting up
so the mold drags the glass (PIC), and indentations from stopping
rotation and blowing so the steam pushes the walls back in
between the vent holes. (Actually, the last two can be a neat
effect if desired.) A well maintained and used wooden mold can
sustain 600 uses without clear damage and if a person doesn't
mind the size of the mold growing, up to 2,000 impressions can be
done. Obviously, mold growth is more important in trying to make
matched sets of goblets (especially matching a set made a couple
of years ago when one breaks). Walter says, in comparing the cost
of a wood mold ($60-100) to a much more expensive metal mold ($600-800),
that by the time a blower has gone through a couple of wood
molds, if the design is any good, it probably has been stolen by
mass production people. The hot shop at the Studio is a very
nicely built fairly standard layout with the addition of extra
secure areas for the public. Some people remarked on the somewhat
odd arrangement where the public enters and walks in a narrow
hallway behind the hot wall until reaching the outer wall of the
building along which is the viewing area with bleachers, the complaint
being that if the hot wall was on the outer wall, the "wasted"
space for the walkway would be part of the blowing floor. I
rather liked this arrangement, because the outer wall is a window
wall, giving light and with them open, ventilation and the floor
was hotter than I expected. The hot wall is effectively an L
shaped room with walls on both sides and ventilation on top.
There is enough space to walk around the equipment and storage
shelves and spaces are included, which makes the shop floor look
neater. Also, with doors on the public hallway, staff can get to
the space without crossing the shop floor. The shop floor is
actually surrounded on four sides with equipment, with one wall
side not part of the "room" described above. This side
includes the sink and a front loading annealer 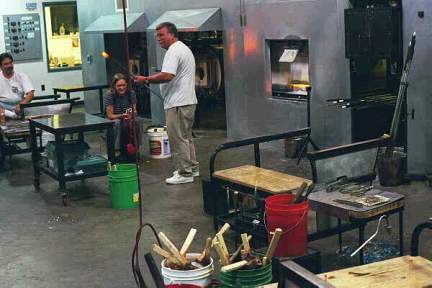
 along with a
small furnace/gloryhole and station used by Bill Gudenrath, who
holds several positions including advisor to the Studio and
consultant to the museum. Bill makes his famous dragon goblets
for a portion of almost every day, working alone. Across a gap
leading to the offices, is the start of the main wall is a vented
fuming hole, followed by gloryhole, main furnace, pipe heater
with color oven above, glory hole, white board, entry, pipe
storage, color furnace, and glory hole. The glory holes are
basically identical, one slightly bigger with two sets of
overlapping doors, all with cast doors. Two roll top annealers of
a discomforting design are on the fourth side of the floor. The
anneallers give visitors a good view of placing the glass, but
the tops are very heavy and neither easy to move or to replace.
Each lid actually has a rolling bridge with a cam lever that
lifts the whole top up about an inch so it can pushed to one side
or the other. Because of the width of the bridge (about 15")
and the fact the track does not extend beyond the base, there is
a space in the center that can be filled only by reaching in
under the lid. Further, the lid must be exactly centered (there
are lineup pins) before lowering or the safety switch that turns
on and off the heating elements will stay off, chilling the
annealler. The anneallers are identical and made of insulating
fire brick with 8 or 10 rows of elements in grooves, thus making
them suitable for casting and slumping if desired. The track is
not very tall and I have been told that people have knocked the
bridge off the track trying to push the lid. There are three work
benches on the floor for the class, each with full tools, and
three marvers on wheels with good thick tops about 2x3 feet.
Additional tools can be requested from the techs and we had out a
table with many steel plates and kiln shelves with a rack and
heavy iron tool for heating cane arrangements in the glory hole.
(parsifoli? sp?) The rack for setting the plates down has a nice
touch - a ballbearing swivel for swaping the plate end to end as
one end tends to heat faster in the glory hole. Curiously, there
are no pipe hangers and many of the punties and some of the pipes
have no collar for hanging.
along with a
small furnace/gloryhole and station used by Bill Gudenrath, who
holds several positions including advisor to the Studio and
consultant to the museum. Bill makes his famous dragon goblets
for a portion of almost every day, working alone. Across a gap
leading to the offices, is the start of the main wall is a vented
fuming hole, followed by gloryhole, main furnace, pipe heater
with color oven above, glory hole, white board, entry, pipe
storage, color furnace, and glory hole. The glory holes are
basically identical, one slightly bigger with two sets of
overlapping doors, all with cast doors. Two roll top annealers of
a discomforting design are on the fourth side of the floor. The
anneallers give visitors a good view of placing the glass, but
the tops are very heavy and neither easy to move or to replace.
Each lid actually has a rolling bridge with a cam lever that
lifts the whole top up about an inch so it can pushed to one side
or the other. Because of the width of the bridge (about 15")
and the fact the track does not extend beyond the base, there is
a space in the center that can be filled only by reaching in
under the lid. Further, the lid must be exactly centered (there
are lineup pins) before lowering or the safety switch that turns
on and off the heating elements will stay off, chilling the
annealler. The anneallers are identical and made of insulating
fire brick with 8 or 10 rows of elements in grooves, thus making
them suitable for casting and slumping if desired. The track is
not very tall and I have been told that people have knocked the
bridge off the track trying to push the lid. There are three work
benches on the floor for the class, each with full tools, and
three marvers on wheels with good thick tops about 2x3 feet.
Additional tools can be requested from the techs and we had out a
table with many steel plates and kiln shelves with a rack and
heavy iron tool for heating cane arrangements in the glory hole.
(parsifoli? sp?) The rack for setting the plates down has a nice
touch - a ballbearing swivel for swaping the plate end to end as
one end tends to heat faster in the glory hole. Curiously, there
are no pipe hangers and many of the punties and some of the pipes
have no collar for hanging.
Since most/all the names of people in the class will be unknown
to readers, I will describe a few of their characteristics. The
class itself had 8 people, 2 women and 6 men, plus a technical
assistant who was well known to me as he comes from down the road
in Austin. The distance record in our class was a guy and a gal
from far southern CA (although a gal in the torchworking class
was from Alaska.) Not counting my strange situation, the lowest
experience guy was a year, while several people in the class had
well over 10 years experience. The guy with the most public
experience is probably the one who works at the Ford Museum. One
gal had one of the Glass Center fellowships at Wheaton NJ. Two
people came from the ends of MA, one each from NJ and PA.
A part of the class was guided tours of special areas of the
museum operation, including the Steuben glass factory located
next to it. Bill Gudenrath led the tour of the museum itself, in
the evening near closing. His historical information was
especially useful. The museum, at the moment, is much reduced in
size as it is being rebuilt in anticipation of its 50th birthday
and the city's 150th. The historical glass shown is contained in
a Best of the Corning Museum gallery, arranged as much as
possible by technique, so similar work on the glass down through
the centuries is gathered together in groups of six to ten pieces.
Recently opened are the newest parts of the museum, including one
area featuring scientific uses of glass, including the damaged
blank of the first Palomar mirror disk, and another gallery of
contemporary art glass. The Rakow Library is getting its own
building near the Studio and space freed up is being converted to
galleries. Two specialized visits were to the photographer for
the museum and the glass study rooms.
The manager of the photographic department and chief
photographer, Nicholas L. Williams, showed us his rig
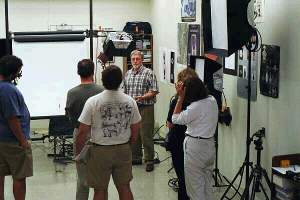 and set up a couple of pieces brought by
students. My photos
and set up a couple of pieces brought by
students. My photos 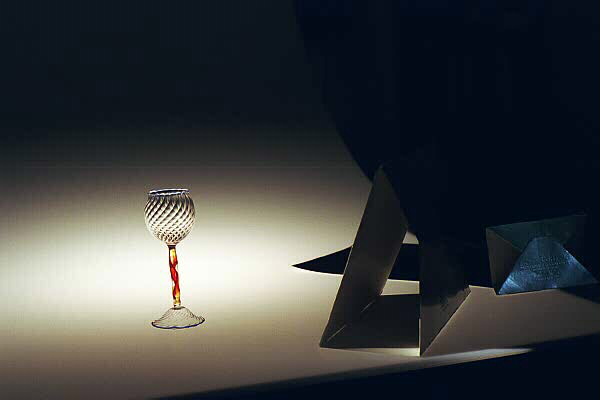 make it clear that good lighting does great
things to glass even if the camera is handheld with fast film. He
shoots slow fine grain film with long exposures for depth of
field. He uses a large sheet of white Plexiglas sandblasted F95
on one side and lights from below as well as all around above. He
has many fairly low power lights and snouts that fit them so he
is highlighting with beams of light an inch or less in diameter
in some cases. He likes a 105mm macro lens, but is often shooting
6x6 film format. We had a considerable discussion of the state of
electronic cameras, he saying they are continually improving and
liking one I won't name because it might imply museum endorsement.
make it clear that good lighting does great
things to glass even if the camera is handheld with fast film. He
shoots slow fine grain film with long exposures for depth of
field. He uses a large sheet of white Plexiglas sandblasted F95
on one side and lights from below as well as all around above. He
has many fairly low power lights and snouts that fit them so he
is highlighting with beams of light an inch or less in diameter
in some cases. He likes a 105mm macro lens, but is often shooting
6x6 film format. We had a considerable discussion of the state of
electronic cameras, he saying they are continually improving and
liking one I won't name because it might imply museum endorsement.
The glass study rooms give a suggestion as to how complete the
collection in the museum really is. In a rather small space set
aside from construction are a dozen or more examples per shelf, 4-5
shelves per case, 4-5 cases per row, 4-5 rows of glass. The cases
are well lighted for selecting glass and specific areas (such as
mold blown bottles) may include a dozen or more examples. We were
able to examine several pieces close-up (without touching) and the
instructors discussed features of them.
For me, a highlight visit was getting out on the floor of the
Steuben factory next to the museum. Not many people were working
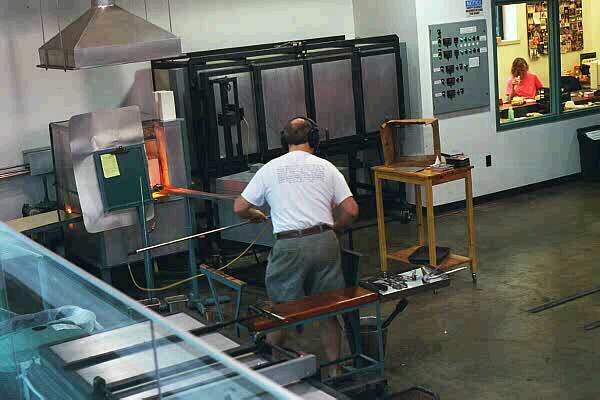
as late in the day as we visited. The steps taken to keep the
glass pure and consistent are impressive: a platinum rod is moved
constantly through the furnace, stopped with a foot switch for
smaller gathers. Larger gathers are taken from the underneath the
furnace where a stream of molten Steuben crystal runs constantly
at a rate of 2 pounds per minute (the runoff into water being
remelted) When a specific product/team needs a "gather"
they set a switch and a worker puts a cylindrical collector in
the stream for a precise time, like 2 minutes 35 seconds. The
collector is spring loaded so the glass is always added to the
top (not collected at the bottom then filled up the sides,
possibly adding bubbles). The worker sets a switch for a light at
the team and the container is raised to floor level where a
worker punches a pipe into it - one "gather" for the
whole piece. All the marvers and containers are highly polished
and wiped before every use. Two pieces were being made during our
visit, a large plate worked traditionally and a star vase that
was punched in a mold and then pulled and the neck turned in a
loop to the final shape. In addition, one person was making air
twist stems to add to something else, pulling a cane about 15"
long and getting five or six stems from the middle each cane. Our
teaching assistant, Matthew Labarbra got to work some of the
glass and found it so long working that it completely upset his
timing. A new site for Steuben is www.steuben.com. (Cameras are
not allowed on the factory floor.)
By the way, the museum provides access to a close up glassblowing
demo on a balcony over the factory. One of the neat points is
that a series of cameras and monitors show close ups of the work
being done, including one shooting through a silica plate into
the back of the glory hole. The camera views are controlled by
rubber footpad switches on the floor and while the gaffer is
standing on one, if the narrator steps on another, a computer
selects which combination of views are to appear on the monitors,
preparing for the next move of the gaffer (i.e.. show the mold
while the gaffer is still at the glory hole.) At almost the last
moment, I remembered my ongoing interest in Hands On Glass, an
operation that started as a non-profit in Corning and has
continued for more years than some of these operations have. I
called on Friday night to see if someone was still there and
how far out it was and hiked on over.
Studio Description - Hands On
Hands On Glass is a small operation a brisk walk from the Corning company
campus offering torch and furnace working and rental. Pictures are shown
on the hotwall page and in the
class gallery.
Block given to members
KOHLER - My new (2000-3-6) nominee for
best book on all aspects of glass working is the 1998 book by
glass artist Lucartha Kohler, Glass, An Artist's Medium, [ISBN:0-87431-604-x, Krause Publications, 700 E.
State St., Iola WI 54990-0001, orders 1-800-258-0929, 715-445-2214;
Dallas Public Lib. CFA 748.2 K79g]. Because Kohler has worked in
many of the variations of glass that she is writing about, she
gives excellent coverage of almost every aspect of glass working
(except furnace glass where casting gets more coverage than
blowing and that not much.) More importantly, she seems to give
enough information about doing stuff, like glass painting or kiln
working or cold working that a person can understand how to do it.
This is not an elementary exercise book and it is not a complete
coverage of all aspects of glass; it is a good coverage of some
aspects of many ways of working with glass with particular
attention to kiln worked and cast glass which she has done a lot
of. A good list of sources, a glossary, and notes on Safety.
GAS REGISTRATION Subject: G.A.S.
Conference Registration - FEES INCREASE 4/15
Date: Tue, 04 Apr 2000 09:07:26 +0800
From: glassartsoc@earthlink.net
To: mikefirth
Dear Mike Firth,
Don't Delay Register Today!! (before registration fees increase
on April 15, 2000)
For the Glass Art Society's 30th Annual Conference "G.A.S.
2000: Bridge to the Future", June 8 - 11, 2000 in Brooklyn, NY USA.
Register on-line with Visa or Master Card:
http://www.glassart.org/registration.shtml
Pre-Conference Information is available from the Glass Art
Society web site:
http://www.glassart.org/conferences/newyork/index.shtml
A Registration Form can also be sent via "snail" mail
and by fax however we will not be able to
take registration over the phone.
Conference fees:
After May 15, register on site. ($275 per person/ $150 per Full-
Time Student.) We are unable to process registration forms
received in the office after May 15.
Pre-Registration Fees:
Regular- $225 per person January 15 - April 15 $250 per person
April 16 - May 15
Student - Must include copy of student ID to be eligible for
Student rates.
$ 100 per Full-time student January 15 -April 15
$ 125 per Full-time student April 16 -May 15
Daily/Auction Party Fees: (If you pay Regular or Student
Registration Fees (above) you do not need to pay Daily/Auction
Fees.) $100 per person, per day $50 per Full - time student per
day
$50 Auction/ Party ONLY (Attn. Attendees: the party is included
in your conference fee)
Special Tours and Events
NoHo Loft Party (Wed., June 7, $150 per person)(limit 100 people)
Stained Glass Windows Tour (Sun. June 11, $35 per person)(limit
35 people)
VIP Tour of the Met (Sun., June 11, $100 per
person)(limit 35 people)
If you would like additional information or have questions please
contact:
Elizabeth Byrd Tel: 206-382-1305
Registrar/Administrative Assistant Fax: 206-382-2630
Glass Art Society Email: glassartsoc@earthlink.net
1305 4th Ave.,Suite 711 Internet: www.glassart.org
Seattle, WA 98101-2401
---------------------------------------------------------
Glass Art Society
Advancing the Appreciation,
Understanding and Development of the Glass Arts Worldwide
****Hot Glass Bits is a personal chronological record of my
wanderings through glassblowing and the bits and pieces of
knowledge I gather along the way. It includes things I try,
thoughts I have, information I receive, and reports on things I
do. In many ways it is an edited diary and events calendar about
glassblowing. If it is useful to others, it is worth the effort.
WHOAMI? - Mike Firth is a 54 year old,
low experience glassblower who signed up for his first class in '91
without having seen anyone blow, although he had seen TV shows,
and had done stained glass and worked clear tubing in the past.
He has built cheap equipment in his back yard to learn and
practice and is now on his second round, more traditional, of
equipment. When not blowing, he is a married employee of the best
hardware store around. The legal stuff: Working glass is
inherently dangerous, involving heavy materials that can be razor
sharp, so hot that damage can be done before feeling occurs, with
chemicals immediately poisonous, dusts that can damage the lungs,
and heat sources that can wreck the eyes. Understand the safe
practices required and use them to blow beautiful glass. Blow
Good Glass
Hot Glass in Texas Dallas - Kittrell-Riffkind Art Glass, [5100
Beltline Suite, Suite 820, 214-239-7957]
Dallas: Carlyn Galerie, [6137 Luther Lane, 214-368-2828] A
Gallerie of Glass into November In Wimberley, southwest of
Austin, Sable V Fine Art Gallery, [The Courtyard Overlooking
Cypress Creek, 512-847-8975]
The MSC Forsyth Center Galleries [Student Center, Texas A&M
University, College Station, 409-845-9251]
I send Hot Glass Bits to: Those who are mentioned in an issue, Hot
Glass Texans, others I feel like sending a copy to
Sitemap